
Imagine being able to search phrases in every call you've had to find exactly what was said. That's the dream, right? Well - it's my dream, and it's what we're building today.
Users can call a Twilio phone number, which will be forwarded to your agent while recording. Once the call is completed, we will get a transcript using Deepgram's Speech Recognition API and make it available through a searchable dashboard we'll put together with Vue.js. The front-end is super light, so you could build it with any framework (or none at all).

If you want to look at the final project code, you can find it at https://github.com/deepgram-devs/twilio-voice-searchable-log.
Before We Start
You will need:
- Node.js installed on your machine - download it here.
- A Deepgram API Key - get one here.
- A Twilio Account SID and Auth Token and a Twilio phone number - get one here.
- Use of two phones to test your project - one to make the call and one to receive.
Create a new directory and navigate to it with your terminal. Run npm init -y to create a package.json file and then install the following packages:
npm install @deepgram/sdk twilio dotenv express body-parser nedb-promises
Create a .env file, open it in your code editor, and populate it with your credentials and settings:
DG_KEY=replace_with_deepgram_key
TWILIO_ACCOUNT_SID=replace_with_sid
TWILIO_AUTH_TOKEN=replace_with_auth_token
TWILIO_NUMBER=replace_with_twilio_phone_number
FORWARDING_NUMBER=replace_with_your_phone_number
You should not share this .env file as it contains sensitive credentials. If you are using git version control, make sure to ignore this file.
Create an index.js file, and open it in your code editor.
Preparing Dependencies
At the top of your file require these packages:
require('dotenv').config()
const express = require('express')
const bodyParser = require('body-parser')
const nedb = require('nedb-promises')
const Twilio = require('twilio')
const { Deepgram } = require('@deepgram/sdk')
Create a new nedb database. This will either load an existing file, or create one if it doesn't exist:
const db = nedb.create('calls.db')
Initialize the Twilio Helper library and Deepgram Node SDK:
const twilio = new Twilio(process.env.TWILIO_ACCOUNT_SID, process.env.TWILIO_AUTH_TOKEN)
const deepgram = new Deepgram(process.env.DG_KEY)
Creating An Express Server
Initialize an express instance, configure body-parser and a public directory, and start it at port 3000:
const app = express()
app.use(bodyParser.urlencoded({ extended: false }))
app.use(express.static('public'))

// Further code goes here

app.listen(3000, console.log(`Listening at ${new Date().toISOString()}`))
Project Overview
When a user rings our Twilio number, our application will be sent a POST request with a bunch of information - we will grab their phone number and the call identifier and add it to our database. We will instruct our application to forward the call to our real number and begin recording. Once the call is completed (or after the default one-hour limit), the recording will be saved, and, once ready, Twilio will send recording information back to our application.
We send the recording URL to Deepgram and receive a transcript in return. The recording details also contain the call identifier, so we can add the recording URL and the transcript to the existing database entry.
Once we have data in a database - the final step is to build the web dashboard with client-side search, which we will do towards the end of this blog post.
Configure Your Twilio Number
When Twilio sends data to an application, it expects a publicly-accessible URL, but our application is only on our local machine. Fortunately, we can use ngrok to provide a temporary public URL that will forward requests to our locally-running application. Open a new terminal and run the following:
npx ngrok http 3000
Once running, you will see a Ngrok URL in the terminal dashboard which we can provide to Twilio. If you restart your terminal, ngrok, or after 24 hours, the URL will change, and you need to complete the next step again.
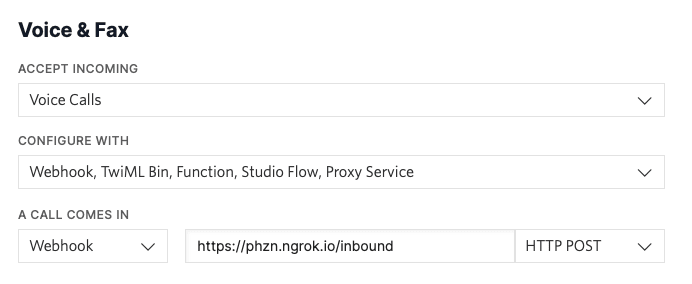
Navigate to your phone number's settings in the Twilio Console, and configure incoming calls to send a HTTP POST request to your ngrok URL followed by /inbound.
Handle Inbound Calls
In your index.js file add a new route handler for receiving Twilio calls:
app.post('/inbound', async (req, res) => {
  const { Caller, CallSid } = req.body

  // Add caller number, call indetifier, and date to the database
  await db.insert({ Caller, CallSid, date: new Date() })

  // Create Twilio instructions
  const twiml = new Twilio.twiml.VoiceResponse()
  const dial = twiml.dial({
    record: 'record-from-answer-dual',
    recordingStatusCallback: '/recordings',
  })
  dial.number(process.env.FORWARDING_NUMBER)

  // Send response to Twilio
  res.type('text/xml')
  res.end(twiml.toString())
})

// Further code here
The dial variable is the most critical bit here - we tell Twilio to record the call once it is answered and to record each speaker in their own channel. This isn't required but will lead to higher-quality transcripts later. Once the recording is ready, we tell Twilio to send a POST request with data to /recordings. Finally, we tell Twilio to forward this call to the number in our .env file - perhaps a reception or sales rep.
Before we test this, create an empty route handler for recordings:
app.post('/recordings', async (req, res) => {
  console.log('Recording received')
  // Further code here

  res.send('ok')
})
Test your code! Run with node index.js while making sure ngrok is still running. Call your Twilio number from a phone number that is different from the one in .env and your forwarding number should ring. Answer, speak, hang up, and you should see 'Recording received' in your terminal a few seconds later.
Generate and Save Transcripts
Replace your /recordings route handler:
app.post('/recordings', async (req, res) => {
  console.log('Recording received')

  // Get values from data
  const { CallSid, RecordingUrl } = req.body

  // Get transcript
  const transcriptionFeatures = {
    punctuate: true,
    utterances: true,
    model: 'phonecall',
    multichannel: true,
  }
  const transcript = await deepgram.transcription.preRecorded(
    { url: RecordingUrl },
    transcriptionFeatures
  )

  // Format response
  const utterances = transcript.results.utterances.map((utterance) => ({
    channel: utterance.channel,
    transcript: utterance.transcript,
  }))

  // Update database entry
  await db.update({ CallSid }, { $set: { RecordingUrl, utterances } })
  res.send('ok')
})
Twilio sends a body of data along with this request - we only care about the call identifier and the URL of the recording, so we pull those out by destcructuring the object.
Then, we ask Deepgram for a transcript. Let's recap the features we use:
- The
punctuatefeature adds punctuation for easier reading. - The
utterancesfeature will return the spoken phrases rather than just words, and specifies the user who spoke them. - The
modelfeature lets us specify a model to use. We have a few, and the default model would probably perform quite well, but we specifically have one trained for phone calls, so we specify it here. - The
multichannelfeature tells Deepgram that we are sending an audio file with multiple audio channels (one for each speaker). It improves transcription quality as we can accurately identify who is speaking at any point in time.
Once we provide the recording URL and receive a response from Deepgram, we format the response. The output is an array that looks like this:
[
  { "channel": 1, "transcript": "Hi, Kev." },
  { "channel": 0, "transcript": "Hello. How are you mum?" },
  { "channel": 1, "transcript": "I'm fine. Thank you. How are you?" },
  { "channel": 0, "transcript": "Yes. Not too bad at all. Thank you" }
]
Finally, we update the existing database entry for this call to include both the recording URL and the utterances spoken.
Test your code! Repeat the previous test steps, and you should see the database file (calls.db) now containing the new data.
Get All Recordings
The final step to the server-side of this project is to build a route handler that will return all calls which have a transcript included:
app.get('/recordings', async (req, res) => {
  const recordings = await db
    .find({ utterances: { $exists: true } })
    .sort({ date: -1 })
  res.json(recordings)
})
This route handler will also sort results, so it's the latest-first.
Receive Data In The Browser
Our search will consist of three parts:
- A search box which, when typed in, will fuzzy search all call transcripts fetched from the database. We will use Fuse.js for the fuzzy search.
- An updating list of results which will show the phrases that matched the earch term.
- When a result is clicked, a full transcript of the call.
Create a public directory and an index.html file inside of it. Open the file and scaffold a page:
<!DOCTYPE html>
<html>
  <head>
    <meta charset="UTF-8" />
    <title>Twilio x Deepgram Call Transcripts</title>
    <style></style>
  </head>
  <body>
    <div id="app"></div>
    <script src="https://cdn.jsdelivr.net/npm/vue@2.6.14"></script>
    <script src="https://cdn.jsdelivr.net/npm/fuse.js@6.4.6"></script>
    <script>
      const app = new Vue({
        el: '#app',
        data: {
          fuse: false,
          calls: {
            all: [],
            selected: false,
          },
          filter: {
            term: '',
            results: [],
          },
        },
        async created() {
          // Further code goes here
        },
        methods: {
          search() {},
        },
      })
    </script>
  </body>
</html>
Our first goal is to populate data.calls.all with the items from the database returned from the GET /recordings route handler, and then create a Fuse search index with those items. Inside the created() method:
this.calls.all = await fetch('/recordings').then((r) => r.json())
this.fuse = new Fuse(this.calls.all, {
  keys: ['Caller', 'utterances.transcript'],
  includeMatches: true,
  threshold: 0.5,
})
Restart your server, navigate to http://localhost:3000 in your browser. Open the DevTools Console and type app.calls.all to see if the value was populated correctly:

Search Transcripts
Inside of your <div id="app"> add a text input:
<input
  type="text"
  placeholder="Search term"
  v-model="filter.term"
  @keyup="search"
/>
Then, inside of the empty search() method conduct a search with Fuse and assign the result to data.filter.results:
this.filter.results = this.fuse.search(this.filter.term)
Now we have results being computed, let's display them right under the <input>:
<ol id="results">
  <li v-for="result in filter.results">
    <p><b>{{ result.item.Caller }} on {{ result.item.date }}</b></p>
    <p v-for="match in result.matches">{{ match.value }}</p>
  </li>
</ol>

Show Full Transcript
When an search result is clicked, let's show the whole transcript. Add this attribute to the end of the <li> element - it will set data.calls.selected to the clicked item:
<li v-for="result in filter.results" @click="calls.selected = result">
Then, below the <ol> add another <ol> to show the utterances in the transcript:
<ol id="full-call" v-if="calls.selected">
  <li v-for="utterance in calls.selected.item.utterances">
    <small>{{ utterance.channel == 0 ? 'Receiver' : 'Caller' }}</small>
    <p>{{ utterance.transcript }}</p>
  </li>
</ol>
With the predictability of multichannel audio from Twilio, the receiver of the forwarded call is always on channel 0, so we can display in nicer terms who is speaking.
Finally, add the following CSS to the <style> tag in the <head>:
* { margin: 0; padding: 0; font-family: sans-serif; }
#app { display: grid; grid-template-columns: 1fr 1fr; paddi g: 1em; gap: 2em }
input { grid-column: 1 / span 2; font-size: 1em; padding: 0.5em; }
li { list-style: none; margin-bottom: 1em; }
#results li { cursor: pointer; }
Refresh and you should see the finished project:
Wrapping Up
We've done quite a lot here - how to forward and record calls with Twilio, how to handle recording payloads to get transcripts, and implement basic client-side fuzzy search. There's a lot more we could do to expand on this project:
- Implement outbound call recording
- Group calls under specific callers
- Allow users to make notes for calls or callers
- Use a more permanent database like Supabase - Brian wrote a getting started post here
The complete project is available at https://github.com/deepgram-devs/twilio-voice-searchable-log and if you have any questions please feel free to reach out on Twitter - we're @DeepgramDevs.


