If in your mind “Apache Flink and “streaming programming does not have a strong link you probably was not following news recently. Apache Flink took the world of Big Data by storm. Now is a perfect opportunity for a tool like this to thrive: stream processing becomes more and more prevalent in data processing, and Apache Flink presents a number of important innovations.
In this article, I will show how to start writing stream processing algorithms using Apache Flink. We will read a stream of Wikipedia edits and will see how can get some meaningful data out of it. In the process, you will see how to read and write stream data, how to perform simple operations, and how to implement more complex algorithms.
Getting started
I believe that if you are new to Apache Flink, it’s better to start with learning about batch processing since it is simpler and will give you a solid foundation to learning stream processing. I’ve written an introductory blog post about how to start with batch processing using Apache Flink, so I encourage you to read it first.
If you already know how to use batch processing in Apache Flink, stream processing does not have a lot of surprises for you. As before we will take a look at three distinct phases in your application: reading data from a source, processing data, and writing data to an external system.

There are few notable differences comparing to the batch processing. First of all, in batch processing, all data is available in advance. We do not process new data even if it arrives while we the process is running.
It is different in stream processing though. We read data as it is being generated and the stream of data that we need to process is potentially infinite. With this approach, we can process incoming data in almost real-time.
In the stream mode, Flink will read data from and write data to different systems including Apache Kafka, Rabbit MQ, basically systems that produce and consume a constant stream of data. Notice that we can read data from HDFS or S3 as well. In this case, Apache Flink will constantly monitor a folder and will process files as they arrive.
Here is how we can read data from a file in the stream mode:
StreamExecutionEnvironment env = StreamExecutionEnvironment.getExecutionEnvironment();
DataStream<String> stream = env.readTextFile("file/path");
Notice that to use stream processing we need to use the StreamExecutionEnvironment class instead of the ExecutionEnvironment. Also methods that read data return an instance of DataStream class that we will use later for data processing.
We can also create finite streams from collections or arrays as in the batch processing case:
DataStream<Integer> numbers = env.fromCollection(Arrays.asList(1, 2, 3, 4, 5 6);
DataStream<Integer> numbers = env.fromElements(1, 2, 3, 4, 5);
Simple data processing
To process a stream of items in an stream Flink provides operators similar to batch processing operators like: map, filter, and mapReduce.
Let’s implement our first stream processing example. We will read a stream of edits to Wikipedia and display items that we are interested in.
First, to read edits stream, we need to use the WikipediaEditsSource:
DataStream<WikipediaEditEvent> edits = env.addSource(new WikipediaEditsSource());
To use it we need to call the addSource method that is used to read data from various sources such as Kafka, Kinesis, RabbitMQ, etc. This method returns a stream of edits that we can now process.
Let’s filter all edits that were not made by a bot and that have changed more than a thousand bytes:
edits.filter((FilterFunction<WikipediaEditEvent>) edit -> {
    return !edit.isBotEdit() && edit.getByteDiff() > 1000;
})
.print();
This is very similar to how you can use the filter method in the batch case, with the only exception that it process an infinite stream.
Now the last step is to run our application. As before we need to call the execute method:
env.execute()
The application will start to print filtered wikipedia edits until we stop it:
2> WikipediaEditEvent{timestamp=1506499898043, channel='#en.wikipedia', title='17 FIBA Womens Melanesia Basketball Cup', diffUrl='https://en.wikipedia.org/w/index.php?diff=802608251&oldid=802520770', user='Malto15', byteDiff=1853, summary='/* Preliminary round */', flags=0}
7> WikipediaEditEvent{timestamp=1506499911216, channel='#en.wikipedia', title='User:MusikBot/StaleDrafts/Report', diffUrl='https://en.wikipedia.org/w/index.php?diff=802608262&oldid=802459885', user='MusikBot', byteDiff=11674, summary='Reporting 142 stale non-AfC drafts', flags=0}
...
Stream windows
Notice that methods that we’ve discussed so far before all work on individual elements in a stream. It’s unlikely that we can come up with many interesting stream algorithms that can be implemented using these simple operators. Using just them it will be impossible to implement following use-cases:
- Count a number of edits that are performed every minute
- Count how many edits were performed by each user every ten minutes
It’s obvious that to answer these questions we need to process groups of elements. This is what stream windows are for.
In the nutshell stream windows allow us to group elements in a stream and execute a user-defined function on each group. This user-defined function can return zero, one, or more elements and in this way, it creates a new stream that we can process or store in a separate system.
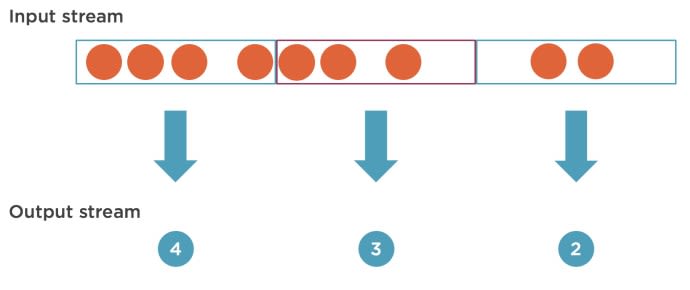
How can we group elements in a stream? Flink provides several options to do this:
- Tumbling window – creates non-overlapping adjacent windows in a stream. We can either group elements by time (say, all elements from 10:00 to 10:05 go into one group) or by count (first 50 elements go into a separate group). For example, we can use this to answer a question like: count a number of elements in a stream for non-overlapping five-minute intervals.
- Sliding window – similar to the tumbling window but here windows can overlap. We can use it if we need to calculate a metric for the last five minutes, but we want to display an output every minute.
- Session window – in this case, Flink groups events that occurred close in time to each other.
- Global window – in this case, Flink puts all elements to a single window. This is only useful if we define a custom trigger that defines when a window is finished.

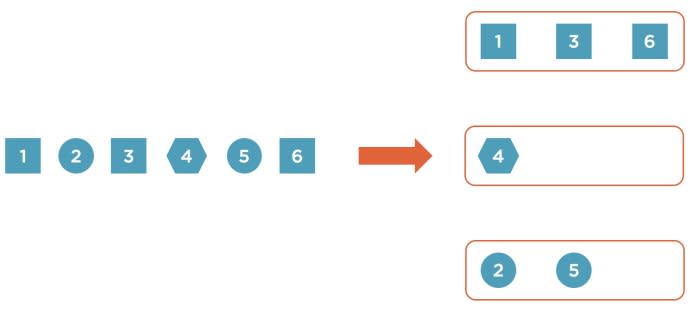
In addition to selecting how to assign elements to different windows, we need to select a stream type. Flink has two window types:
- Keyed stream – with this stream type Flink will partition a single stream into multiple independent streams by a key (e.g., name of a user who made an edit). When we process a window in a keyed stream a function that we define only has access to items with the same key, but working with multiple independent streams allows Flink to parallelize work.
- Non-keyed stream – in this case, all elements in the stream will be processed together and our user-defined function will have access to all elements in a stream. The downside of this stream type is that it gives no parallelism and only one machine in the cluster will be able to execute our code.
Now let’s implement some demos using stream windows. First of all let’s find how many edits are performed on Wikipedia every minute. First we need to read a stream of edits:
final StreamExecutionEnvironment env = StreamExecutionEnvironment.getExecutionEnvironment();
DataStream<WikipediaEditEvent> edits = env.addSource(new WikipediaEditsSource());
Then we need to specify that we want to separate the stream into one-minute non-overlapping windows:
edits
    // Non-overlapping one-minute windows
    .timeWindowAll(Time.minutes(1))
And now we can define a custom function that will process all elements in each one-minute window. To do this, we will use the apply method and pass an implementation of the AllWindowFunction:
edits
    .timeWindowAll(Time.minutes(1))
    .apply(new AllWindowFunction<WikipediaEditEvent, Tuple3<Date, Long, Long>, TimeWindow>() {
        @Override
        public void apply(TimeWindow timeWindow, Iterable<WikipediaEditEvent> iterable, Collector<Tuple3<Date, Long, Long>> collector) throws Exception {
            long count = 0;
            long bytesChanged = 0;

            // Count number of edits
            for (WikipediaEditEvent event : iterable) {
                count++;
                bytesChanged += event.getByteDiff();
            }

            // Output a number of edits and window's end time
            collector.collect(new Tuple3<>(new Date(timeWindow.getEnd()), count, bytesChanged));
        }
    })
    .print();
Despite being a bit verbose the method is pretty straightforward, the apply method receives three parameters:
- timeWindow – contains information about a window we are processing
- iterable – iterator for elements in a single window
- collector – an object that we can use to output elements into the result stream
All we do here is counting a number of changes and then using the collector instance to output the result of our calculation together with the end timestamp of a window.
If we run this application we will see items produced by the apply method printed into the output stream:
1> (Wed Sep 27 12:58:00 IST 2017,62,62016)
2> (Wed Sep 27 12:59:00 IST 2017,82,12812)
3> (Wed Sep 27 13:00:00 IST 2017,89,45532)
4> (Wed Sep 27 13:01:00 IST 2017,79,11128)
5> (Wed Sep 27 13:02:00 IST 2017,82,26582)
Keyed stream example
Now let’s take a look at a bit more complicated example. Let’s count how many edits a user does per each ten-minutes interval. This can help to identify most active users or to find some unusual activity in the system.
Of course, we could just use a non-keyed stream, iterate over all elements in a window and maintain a dictionary to track counts, but this approach won’t scale since non-keyed streams are not parallelizable. To use resources of a Flink cluster efficiently, we need to key our stream by user name, which will create multiple logical streams: one per user.
DataStream<WikipediaEditEvent> edits = env.addSource(new WikipediaEditsSource());

edits
    // Key by user name
    .keyBy((KeySelector<WikipediaEditEvent, String>) WikipediaEditEvent::getUser)
    // Ten-minute non-overlapping windows
    .timeWindow(Time.minutes(10))
The only difference here is that we use the keyBy method to specify a key for our streams. Here we simply use a username as a partition key.
Now when we have a keyed stream, we can apply a function that will be executed to process each window. As before we will use the apply method:
edits
    .keyBy((KeySelector<WikipediaEditEvent, String>) WikipediaEditEvent::getUser)
    .timeWindow(Time.minutes(10))
    .apply(new WindowFunction<WikipediaEditEvent, Tuple2<String, Long>, String, TimeWindow>() {
        @Override
        public void apply(String userName, TimeWindow timeWindow, Iterable<WikipediaEditEvent> iterable, Collector<Tuple2<String, Long>> collector) throws Exception {
            long changesCount = 0;

            // Count number of changes
            for (WikipediaEditEvent ignored : iterable) {
                changesCount++;
            }
            // Output user name and number of changes
            collector.collect(new Tuple2<>(userName, changesCount));
        }
    })
    .print();
The only significant difference here is that this version of the apply method has four parameters. The additional first parameter specifies a key for the logical stream that our function is processing.
If we execute this application we will get a stream where each element contains a user name and a number of edits this user performed per ten-minute interval:
...
5> (InternetArchiveBot,6)
1> (Francis Schonken,1)
6> (.30.124.210,1)
1> (MShabazz,1)
5> (Materialscientist,18)
1> (Aquaelfin,1)
6> (Cote d'Azur,2)
1> (Daniel Cavallari,3)
5> (00:1:F159:6D32:2578:A6F7:AB88:C8D,2)
...
As you can see some users have a Wikipedia edit spree today!
More information
This was an introductory article, and there is much more to Apache Flink. I will write more articles about Flink in the near future, so stay tuned! You can read my other articles here, or you can you can take a look at my Pluralsight course where I cover Apache Flink in more details: Understanding Apache Flink. Here is a short preview of this course.
The post Getting started with stream processing using Apache Flink appeared first on Brewing Codes.


