Overview
In this post, we'll step through the initial project structure for your Vue components. In the last post, I covered the importance of packaging together a component library. Give that post a quick read, if you haven't yet, for a more context on goals of the project.
Vue project structure
Let's jump right in. We're going to use the Vue CLI 3. Bam!
Luckily, a lot of the once was configuration steps are now handled by the CLI, mostly regarding webpack. That's not to say that you won't eventually need to modify the webpack config with vue.config.js but you'll be surprised how far you can get without doing that. I try to avoid modifying the generic webpack settings, if possible 🙏. Remember, you'll want to to try to lower the barriers to entry of understanding for other developers in order for them to grasp your design choices. Not only for use but also for debugging (which is probably more likely, TBH).
With that in mind, create your Vue project scaffold using the CLI.
vue create vue-component-library
After the project is created, and dependencies downloaded, you should see this in your terminal:
🎉  Successfully created project vue-component-library.
👉  Get started with the following commands:

 $ cd vue-component-library
 $ yarn serve
When prompted during the project initialization, I choose the below options:
Vue CLI v3.0.0
? Please pick a preset: Manually select features
? Check the features needed for your project: Babel, Linter
? Pick a linter / formatter config: Prettier
? Pick additional lint features: Lint on save
? Where do you prefer placing config for Babel, PostCSS, ESLint, etc.? In dedicated config files
? Save this as a preset for future projects? (y/N) n
Make sure to adjust these options in the future if your preferences change. The Vue CLI comes bundled with a nifty GUI that makes it easy to add and remove plugins.
vue-component-library is the name of the component library project (folder, etc.). This does not need to be the same as the programmatic representation of the library. We'll get into that in the upcoming plugin post of the series.
By default, the CLI will create the src/components directory. I consolidate this project directory and project by removing unused items such as App.vue, assets/favicon.ico, etc. The initial structure is typically used as an application baseline. For a typical web application, I leave the setup as-is. Instead, we'll use VuePress for the documentation site functionality.
Next, we'll:
- Remove the
publicdirectory - Remove
src/assets - Remove
components/HelloWorld.vue - Remove
src/App.vue
The directory changes are diffed in the layout below.
  .
- ├── public/
  ├── src/
- │   ├─ assets/
  │   └─ components/
- │      └─ HelloWorld.vue
- └─ App.vue
You make be thinking...did we just delete the whole project? Nope! The CLI adds a tremendous amount of functionality to your project besides the file layout. Note, vue-cli-service and the corresponding devDependencies in the generated package.json.
Consider using the above-generated view structure as a custom Vue app or ejecting your VuePress theme if you'd like fewer guardrails.
{
  "name": "vue-component-library",
  "version": "0.1.0",
  "private": true,
  "scripts": {
    "serve": "vue-cli-service serve",
    "build": "vue-cli-service build",
    "lint": "vue-cli-service lint"
  },
  "dependencies": {
    "vue": "^2.6.6"
  },
  "devDependencies": {
    "@vue/cli-plugin-babel": "^3.0.0",
    "@vue/cli-plugin-eslint": "^3.0.0",
    "@vue/cli-service": "^3.0.0",
    "@vue/eslint-config-prettier": "^4.0.1",
    "babel-eslint": "^10.0.1",
    "eslint": "^5.8.0",
    "eslint-plugin-vue": "^5.0.0",
    "vue-template-compiler": "^2.5.21"
  }
}
Package versions may not be exactly the same depending on creation date.
Component directory structure
For each component, I create three files in a named component directory within src/components.
A generic view of the directory structure is:
.
└─ src/
  └─ components/
    └─ <component-identifier>/
      ├─ <component-identifier>.vue
      ├─ <component-identifier>.spec.js
      └─ index.js
Now, instead, for a hypothetical Button component:
.
└─ src/
  └─ components/
    └─ Button/
      ├─ Button.vue
      ├─ Button.spec.js
      └─ index.js
<component>.vue
Contains the single file component (SFC).
index.js
Imports and exports the component from the self-contained component directory.
<component>.spec.js
Where the component tests will live. If the tests create a snapshot, then a
__snapshots__directory will be created within this directory.
So, for each of the files, let's create a placeholder.
<component>.vue
<template>
  <div>
    <slot></slot>
  </div>
</template>

<script>
  export default {
    name: 'name-of-your-component'
  }
</script>

<style></style>
Components do not need to end up completely self-contained (template + script + style) but I like to start with this approach. I refactor, if needed, as the library grows in size or complexity. There are a lot of opinions about styles with JS or CSS in JS. I like to start with a regular SFC + scoped styles and iterate from there.
Notice that the component has a name. This is very important and will impact our registering the library as a plugin in a few steps. Components are registered and referred to by the name attribute. Try to use an identifier that won't collide with other project dependencies or tags.
index.js
import Button from './Button.vue'

export default Button
<component>.spec.js
We'll leave this file empty for now. Ultimately, this will contain the component tests.
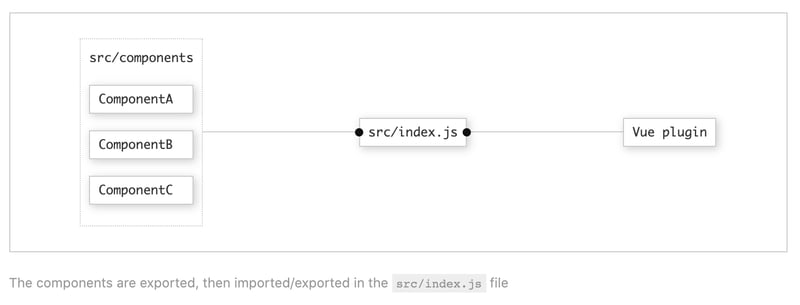
Component export
Within in the src directory, create another index.js file to export the component(s). This file will sit alongside the top level /components directory as below.
 .
 └─ src/
   ├─ components/
   │  └─ ...
+  └─ index.js
In this file, we'll import, and export, the components from this file.
// index.js
export { default as Button } from './Button'
This pattern may seem a bit repetitive but it provides flexibility in the library. The intermediate index.js file consolidates the components to be imported as a one-liner in the entry point file, main.js.
More than one component can live in the same <component> directory. For example, it may make sense to group components in a logical fashion based on usage pattern (i.e. <List> and <ListItem>). If so, adjust the above files to reflect:
// src/components
import List from './List.vue'
import ListItem from './ListItem.vue'

export default { List, ListItem }
And one level higher:
// src/index.js
export { List, ListItem } from './ListComponents'
The foundation is now set to add on the documentation part of the library 📖. But first, we'll consolidate the components into a plugin! We'll get to that next.
Subscribe to get my latest content by email -> Newsletter