In this tutorial, we would be building a simple real-time chat application that demonstrates how to use Kafka as a message broker along with Java, SpringBoot as Backend, and ReactJS on the front-end.
This project is just for learning purposes. It doesn't contain a production-ready code.
What is Kafka
Apache Kafka is a widely popular distributed messaging system that provides a fast, distributed, highly scalable, highly available, publish-subscribe messaging system.
In turn, this solves part of a much harder problem:
Communication and integration between components of large software systems.
What can we do with Kafka?
- Messaging - communicating between apps
- Website Activity Tracking (click, searches...)
- Metrics collection - instead of writing to logs
- Source and target stream processing.
Installation
Before starting the project, We need to download Zookeeper and Kafka.
You can download Kafka from here.
Extract the contents of the compressed file into a folder of your preference.
Inside the Kafka directory, go to the bin folder. Here you’ll find many bash scripts that will be useful for running a Kafka application.
If you are using Windows, you also have the same scripts inside the windows folder. This tutorial uses Linux commands, but you just need to use the equivalent Windows version if you’re running a Microsoft OS.
Start Zookeeper
Zookeeper is basically to manage the Kafka cluster. It comes bundled with the downloaded Kafka directory. So, we need not download it separately.
To start the zookeeper, go to the bin directory and enter the below command.
./zookeeper-server-start.sh ../config/zookeeper.properties
Start Kafka Broker
Next, To start the Kafka broker, run the below command in the same directory
./kafka-server-start.sh ../config/server.properties
Make sure the zookeeper is running before starting Kafka because Kafka receives information such as Offset information kept in the partitions from Zookeeper.
Create a Kafka Topic
After running Zookeeper and Apache Kafka respectively, We can create a Topic and send and receive data as Producer and Consumer.
kafka-topics --create --topic kafka-chat --zookeeper localhost:2181 --replication-factor 1 --partitions 1
Here we are creating a topic kafka-chat to handle chat messages. We would be using this topic later in the chat application.
Now, Let's write some code.
Backend Development with Java, SpringBoot, and Kafka
We would be developing the backend in Spring Boot.
So, download a fresh Spring Boot Project using Spring Initializer with the following details.
- Project: Maven Project
- Language: Java
- Group: com.shubh
- Artifact: kafka-chat-server
- Dependencies:
- Spring for Apache Kafka
- Spring for Websocket
Why WebSockets?
Since Apache Kafka cannot send the Consumer Messages instantly to the client with Classical GET and POST operations.
I performed these operations using WebSockets which provide full-duplex bidirectional communication, which means that information can flow from the client to the server and also in the opposite direction simultaneously.
It is widely used in chat applications.
First lets create a Message Modal which would hold the message content.
Message.java
package com.shubh.kafkachat.model;

public class Message {
    private String sender;
    private String content;
    private String timestamp;

    public Message() {
    }

    public String getTimestamp() {
        return timestamp;
    }

    public void setTimestamp(String timestamp) {
        this.timestamp = timestamp;
    }

    public String getSender() {
        return sender;
    }

    public void setSender(String sender) {
        this.sender = sender;
    }

    public Message(String sender, String content) {
        this.sender = sender;
        this.content = content;
    }

    public String getContent() {
        return content;
    }

    public void setContent(String content) {
        this.content = content;
    }

    @Override
    public String toString() {
        return "Message{" +
                "sender='" + sender + '\'' +
                ", content='" + content + '\'' +
                ", timestamp='" + timestamp + '\'' +
                '}';
    }
}
Developing Producer to push messages to Kafka Topic
First, we would have to write a Config class for the Producer.
ProducerConfiguration.java
@EnableKafka
@Configuration
public class ProducerConfiguration {
    @Bean
    public ProducerFactory<String, Message> producerFactory() {
        return new DefaultKafkaProducerFactory<>(producerConfigurations());
    }

    @Bean
    public Map<String, Object> producerConfigurations() {
        Map<String, Object> configurations = new HashMap<>();
        configurations.put(ProducerConfig.BOOTSTRAP_SERVERS_CONFIG, "localhost:9092");
        configurations.put(ProducerConfig.KEY_SERIALIZER_CLASS_CONFIG, StringSerializer.class);
        configurations.put(ProducerConfig.VALUE_SERIALIZER_CLASS_CONFIG, JsonSerializer.class);
        return configurations;
    }

    @Bean
    public KafkaTemplate<String, Message> kafkaTemplate() {
        return new KafkaTemplate<>(producerFactory());
    }
}
This class creates a ProducerFactory which knows how to create producers based on the configurations we provided.
We also declared a KafkaTemplate bean to perform high-level operations on your producer. In other words, the template can do operations such as sending a message to a topic and efficiently hides under-the-hood details from you.
In producerConfigurations method, we need to perform the following tasks:
-
BOOTSTRAP_SERVERS_CONFIGto set the server address on which Kafka is running. -
KEY_SERIALIZER_CLASS_CONFIGandVALUE_SERIALIZER_CLASS_CONFIGto deserialize the key and value from the Kafka Queue.
The next step is to create an endpoint to send the messages to the Kafka topic.
Create the following controller class for that.
ChatController.java
@RestController
public class ChatController {
@Autowired
private KafkaTemplate<String, Message> kafkaTemplate;
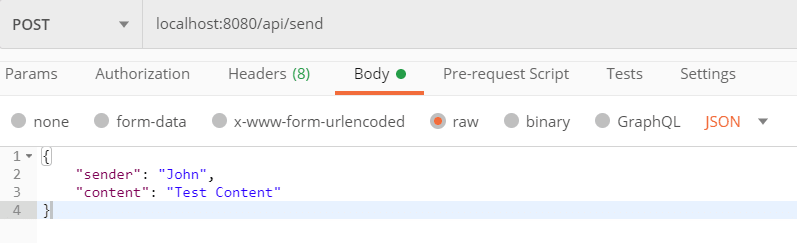
@PostMapping(value = "/api/send", consumes = "application/json", produces = "application/json")
public void sendMessage(@RequestBody Message message) {
message.setTimestamp(LocalDateTime.now().toString());
try {
//Sending the message to kafka topic queue
kafkaTemplate.send(KafkaConstants.KAFKA_TOPIC, message).get();
} catch (InterruptedException | ExecutionException e) {
throw new RuntimeException(e);
}
}
}
As you can see the endpoint is quite simple. When we do POST request to /api/send it Injects the KafkaTemplate configured earlier and sends a message to the kafka-chat topic which we created earlier.
Let's test everything we build until now. Run the main method inside KafakaJavaApp.java class. To run from the command line, execute the following command
mvn spring-boot:run
Your server should be running on port 8080 and you can make API requests against it!
You can use postman to do a POST request as shown below.
But how do you know the command successfully sent a message to the topic? Right now, you don’t consume messages inside your app, which means you cannot be sure!
Fortunately, there is an easy way to create a consumer to test right away. Inside the bin folder of your Kafka directory, run the following command:
./kafka-console-consumer.sh --bootstrap-server localhost:9092 --topic kafka-chat
Hit http://localhost:8080/api/send again to see the message in the terminal running the Kafka consumer
Now let's achieve the same functionality using the Java Code. For that, we would need to build a Consumer or Listener in Java.
Develop a Consumer to listen to Kafka Topic.
Similar to ProducerConfig.java we need to have a Consumer Config to enable the consumer to find the broker.
ListenerConfig.java
@EnableKafka
@Configuration
public class ListenerConfig {
    @Bean
    ConcurrentKafkaListenerContainerFactory<String, Message> kafkaListenerContainerFactory() {
        ConcurrentKafkaListenerContainerFactory<String, Message> factory = new ConcurrentKafkaListenerContainerFactory<>();
        factory.setConsumerFactory(consumerFactory());
        return factory;
    }

    @Bean
    public ConsumerFactory<String, Message> consumerFactory() {
        return new DefaultKafkaConsumerFactory<>(consumerConfigurations(), new StringDeserializer(), new JsonDeserializer<>(Message.class));
    }

    @Bean
    public Map<String, Object> consumerConfigurations() {
        Map<String, Object> configurations = new HashMap<>();
        configurations.put(ConsumerConfig.BOOTSTRAP_SERVERS_CONFIG, KafkaConstants.KAFKA_BROKER);
        configurations.put(ConsumerConfig.GROUP_ID_CONFIG, KafkaConstants.GROUP_ID);
        configurations.put(ConsumerConfig.KEY_DESERIALIZER_CLASS_CONFIG, StringDeserializer.class);
        configurations.put(ConsumerConfig.VALUE_DESERIALIZER_CLASS_CONFIG, JsonDeserializer.class);
        configurations.put(ConsumerConfig.AUTO_OFFSET_RESET_CONFIG, "earliest");
        return configurations;
    }
}
In Consumer Config, similar to Producer Config we are setting the deserializer for key and value.
Additionally we need to set
- GROUP_ID_CONFIG to set the Kafka consumer group ID
- AUTO_OFFSET_RESET_CONFIG to set the Offset Configuration. In this project, we are using the value "earliest" so that we will get all the values in the queue from the beginning. Instead, we can also use "latest" to get only the latest value.
MessageListener.java
@Component
public class MessageListener {
    @Autowired
    SimpMessagingTemplate template;

    @KafkaListener(
            topics = KafkaConstants.KAFKA_TOPIC,
            groupId = KafkaConstants.GROUP_ID
    )
    public void listen(Message message) {
        System.out.println("sending via kafka listener..");
        template.convertAndSend("/topic/group", message);
    }
}
In this class, the @KafkaListener annotated the method that will listen for the Kafka queue messages,
and template.convertAndSend will convert the message and send that to WebSocket topic.
Next, we need to configure the Websocket to send the Message to the client system.
Spring WebSocket Configuration
WebSocketConfig.java
@Configuration
@EnableWebSocketMessageBroker
public class WebSocketConfig implements WebSocketMessageBrokerConfigurer {
    @Override
    public void registerStompEndpoints(StompEndpointRegistry registry) {
        // chat client will use this to connect to the server
        registry.addEndpoint("/ws-chat").setAllowedOrigins("*").withSockJS();
    }

    @Override
    public void configureMessageBroker(MessageBrokerRegistry registry) {
        registry.setApplicationDestinationPrefixes("/app");
        registry.enableSimpleBroker("/topic/");
    }
}
Next add the below MessageMapping in the ChatController.java
    @MessageMapping("/sendMessage")
    @SendTo("/topic/group")
    public Message broadcastGroupMessage(@Payload Message message) {
        //Sending this message to all the subscribers
        return message;
    }
This would broadcast the Message all the client who have subscribed to this topic.
Next, let's move on to developing the UI part.
FrontEnd Development in ReactJS
We would create a simple chat page with a list of messages and a text field at the bottom of the page to send the messages to Kafka backend.
Create React App
We will use Create React App to quickstart the app.
npm install --g create-react-app
create-react-app chat-ui
cd chat-ui
Install dependencies
- axios
- socketjs
- react-stomp
- material-ui
npm install socketjs react-stomp material-ui axios
You can refer documentation of material-ui here.
npm start
Copy the CSS style
Copy the css style from here paste it in the App.css file.
Next, add the below changes to App.js
App.js
import React, { useState } from 'react';
import SockJsClient from 'react-stomp';
import './App.css';
import Input from './components/Input/Input';
import LoginForm from './components/LoginForm';
import Messages from './components/Messages/Messages';
import chatAPI from './services/chatapi';
import { randomColor } from './utils/common';


const SOCKET_URL = 'http://localhost:8080/ws-chat/';

const App = () => {
  const [messages, setMessages] = useState([])
  const [user, setUser] = useState(null)

  let onConnected = () => {
    console.log("Connected!!")
  }

  let onMessageReceived = (msg) => {
    console.log('New Message Received!!', msg);
    setMessages(messages.concat(msg));
  }

  let onSendMessage = (msgText) => {
    chatAPI.sendMessage(user.username, msgText).then(res => {
      console.log('Sent', res);
    }).catch(err => {
      console.log('Error Occured while sending message to api');
    })
  }

  let handleLoginSubmit = (username) => {
    console.log(username, " Logged in..");

    setUser({
      username: username,
      color: randomColor()
    })

  }

  return (
    <div className="App">
      {!!user ?
        (
          <>
            <SockJsClient
              url={SOCKET_URL}
              topics={['/topic/group']}
              onConnect={onConnected}
              onDisconnect={console.log("Disconnected!")}
              onMessage={msg => onMessageReceived(msg)}
              debug={false}
            />
            <Messages
              messages={messages}
              currentUser={user}
            />
            <Input onSendMessage={onSendMessage} />
          </>
        ) :
        <LoginForm onSubmit={handleLoginSubmit} />
      }
    </div>
  )
}

export default App;
Here we are using SocketJsCLient from react-stomp to connect to the WebSocket.
Alternatively, you can also use SockJS from sockjs-client to create a stompclient and connect to the WebSocket.
Next, we need to create Messages Child Component which would show the list of messages.
import React from 'react'

const Messages = ({ messages, currentUser }) => {

    let renderMessage = (message) => {
        const { sender, content, color } = message;
        const messageFromMe = currentUser.username === message.sender;
        const className = messageFromMe ? "Messages-message currentUser" : "Messages-message";
        return (
            <li className={className}>
                <span
                    className="avatar"
                    style={{ backgroundColor: color }}
                />
                <div className="Message-content">
                    <div className="username">
                        {sender}
                    </div>
                    <div className="text">{content}</div>
                </div>
            </li>
        );
    };

    return (
        <ul className="messages-list">
            {messages.map(msg => renderMessage(msg))}
        </ul>
    )
}


export default Messages
LoginForm.js
import React, { useState } from 'react';
import TextField from '@material-ui/core/TextField';
import Button from '@material-ui/core/Button';

const LoginForm = ({ onSubmit }) => {

    const [username, setUsername] = useState("");
    let handleUserNameChange = event => setUsername(event.target.value);

    let handleSubmit = () => {
        onSubmit(username);
    }

    return (
        <div>
            <TextField
                label="Type your username"
                placeholder="Username"
                onChange={handleUserNameChange}
                margin="normal"
                onKeyPress={event => {
                    if (event.key === 'Enter') {
                        handleSubmit();
                    }
                }}
            />
            <br />
            <Button variant="contained" color="primary" onClick={handleSubmit} >
                Login
             </Button>

        </div>
    )
}

export default LoginForm
Final Result
Open the application in multiple windows and send a message in one window. All the other browser window should show the sent messages.
we are using SockJS to listen to the messages, which are sent from the server-side WebSocket.
SourceCode
You can find the complete source code in my Github page.


