Hey 👋
Are you planning to add tests to your React codebase? You cannot find a good tutorial that can help you get started? Then you've landed on the right article. In this article, we'll cover all the steps for writing unit tests. We'll even cover the errors or issues that you might encounter when starting.
This article uses Jest and React Testing Library. It's okay if you want to use other libraries, the fundamentals in this article will help you there as well.
The code is available on GitHub, find the link in the end.
Why should you write tests?
You can develop an entire product without writing tests. Your end users don't care about it. Your Product manager doesn't care about it. Your tester/QA doesn't care about it. But you, as a developer, should! 🤌
Imagine you've a website with thousands of users. You did some refactoring(or added a hotfix) in a common utility function. You tested the change at one place in the app, it worked fine. You deployed it on a "Friday"(rookie mistake). It broke 🔥 production over the weekend. The change you made broke the app at few other places. At this point, you wish you had some sort of tests in place that would automatically run before deploying to production.
Above-mentioned scenario is much more common than you think. You might not have faced it(yet!?), but a lot of engineers have, including me.
Few reasons why testing is important:
🚀 Helps you ship with confidence.
📜 Acts like documentation.
🛠️ Helps in debugging and refactoring.
⌛️ Reduces development time, not initially, but in the long run.
To all the junior devs looking at a promotion - add testing to your skillset. 😉
The Tutorial
We'll start from scratch, so get your terminals ready. Let's use vite for creating a sample project.

Once the project is created, run it using the following command.

After running, you will see a demo app on the screen.

We won't add new features to this app, but we'll refactor the button into a separate component - so we can write tests for it.

Let's add two buttons on the screen:
- A button that will 2x the count when pressed.
- A button that will(in order):
- Divide by 2 if the count ends with 0.
- Add 1 if the count is a Fibonacci number.
- Square the count, otherwise.

We need to declare the functions used, in the utils module. We've used some helper functions which are not needed outside of this module, so we'll not export them.

We're done with our setup, let's start with the tests. Instead of jumping directly into React testing, let's write tests for our utils functions first. This will help us in getting a gist of jest in isolation.
Let's write the test for doubleTheNum function.

The code above tests if our function works as expected. Some key components of any test are:
describefunction: The first argument is the string that will be displayed when our tests run. The second argument is the actual function that will run the tests. It is used to group similar tests. Currently, it only has 1 test but in another example you'll see it can have multiple tests inside it.itfunction: The arguments are similar todescribefunction. The string argument here should state what does the function in the next argument test as clearly as possible. Alternatively, you can usetestfunction instead ofit.expectstatement: The first three lines of the function are straightforward. The last line asserts if our functiondoubleTheNumran correctly. It also usestoEqual- a matcher function.
There are a lot of matchers available in jest. For exmaple:
-
toBeNullmatches onlynull. -
toBeTruthymatches anything that an if statement treats astrue.
Read more about matchers here.
To run the test we need jest installed.
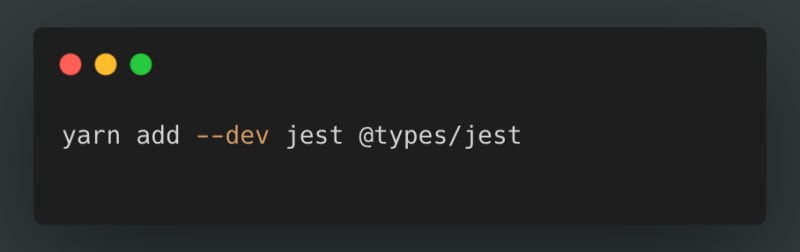
Let's also add a script in package.json to run tests.

Finally, run the tests using yarn test.
For most of you the above steps should be enough. If you face any issues related to module imports or TypeScript. Follow these steps.
- Install and set up
@babel/preset-env.

Add it to package.json

- Install packages for TypeScript support.

Add jest configuration in jest.config.ts.

Run the tests again, it should work this time.

In the output, you can see the strings we used in describe and it function.
🎉 Congratulations on writing your first test!
Enjoying the article so far? Check out my most popular article on Redux: Just Redux: The Complete Guide with ~25K reads.
Need a break? Checkout this amazing picture from my most recent trip to Rishikesh.

More on my Instagram. 😉
Let's write the test for our funkyNum function now.

When writing tests try to cover most of the branches and statements of a function. Better coverage gives more confidence.
If you run the tests again, you should see the following output.

Ideally, we should write a separate describe block for isFibonacci and isPerfectSquare functions. In unit tests, we test code in isolation. For brevity, we didn't do it.
💡 Quick tips
- You can skip any test by calling
it.skiportest.skip.describe.skipwill skip the entire block.

- You can run a single test by calling
it.onlyortest.only.

We've covered how to test JS code using jest. Let's dive into React testing, finally. 💪
We'll need a few packages. Let's install them.

We'll also have to add the environment in jest.config.ts.

Now, we'll write the most basic test for CounterButton component.

We provided the required props and tried to render the component. This should be the first test you write for any component. If it cannot render, it's of no use.
The render function from RTL renders the provided component in document.body.
It also returns some query methods like getByText that can be used to find elements in the DOM.
List of all the query methods is available here.
If you run the tests again, you should see 2 suites - all green and passing.

The second test we'll write will test the component against the props. You should test for each prop separately, if they are independent.
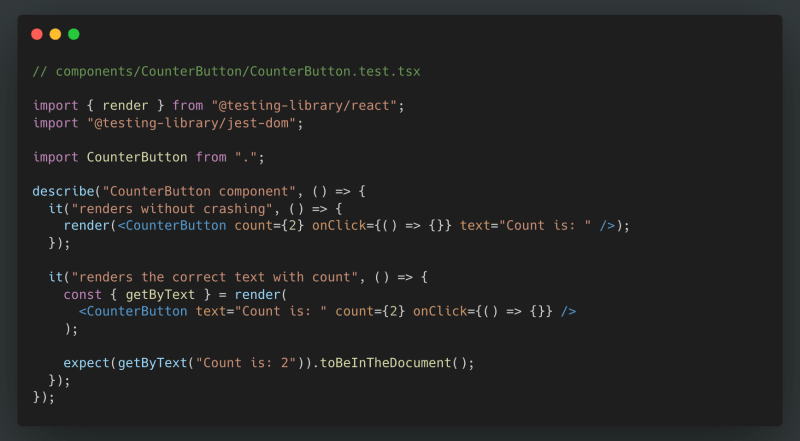
The getByText is a query method that helps us grab an element by using a string.
The toBeInTheDocument method is matcher just like toEqual. It doesn't come with jest by default. It comes from the package we installed earlier - @testing-library/jest-dom.
There are different packages for different environments like @testing-library/jest-native for React Native.
If you run the test again, it should be passing.
Finally, we have come to the final test of this article and it's an important one. We'll write a test to check if the click handler works as expected.
To generate user events like clicking and typing, we'll need another package.

It looks almost same, with some minor differences.

Notice how the function is now async because of the user event.
On the very first line, jest.fn() is a mock function that tracks a lot of things useful in testing like the number of times it was called, the arguments it was called with, etc. You'll see a lot of these out there.
We've also used a new query method getByRole to find the button element.
We wait for the click event to occur before checking if our mock function was called.
That's it! If you run the tests, they should pass.

🔗 You can find all the code here.
👀 What's next?
If you were able to follow through the article, you can start writing tests in your codebase and explore further.
Some keys topics I'd suggest after this are:
-
getByTestId- This is a common query method that you'll see out there. When nothing works, this will. - Learn about Setup and Teardown methods. It will level up your testing game.
- Learn how to mock npm modules, API calls, global state, context, etc.
If you liked the article, consider sharing it with others. 🤝
I write detailed articles on such topics, feel free to connect with me on LinkedIn or X. 🙏