
This tutorial is based on a workshop I gave at the Codeland conference in NYC in 2019.
For the purpose of this tutorial we will use Firefox, though most concepts carry over to other browsers as well.
The code for this tutorial can be found here
What Is A Browser Extension?
In it's most basic form, a browser extension is simply a JavaScript file that runs code in your browser to modify/improve your browsing experience.
Were you ever looking at a web page and wished you could change something about it? Maybe there were too many ads? Perhaps you didn't like the font? Could be the color theme was too bright?
Whatever the case is if the change you wish to see is something that can happen in the browser (i.e., it's a change on the front-end that doesn't involve any of the back-end) then chances are you can write a browser extension to do it.
Some changes are easier to implement than others, but as a general rule, if the change is something the web developer could have implemented using JavaScript, then you can probably write an extension to do it yourself!
Structure Of A Browser Extensions
Browser Extensions come in a wide range of size and complexity, but at their heart, they all share the same basic template.
Here is a simple extension:
sample-extension
└───images
│   └───icon-48.png
│   └───icon-96.png
│   └───image1.jpg
│   └───image2.jpg
│
└───manifest.json
└───sample-extnsion.js
The extension lives in a folder which I called sample-extension.
At the heart of the extension is a file called manifest.json. The manifest is a JSON file that contains the information your browser needs in order to know when and how to run your extension. We will take a closer look at the manifest in a moment.
The actual code for your extension lives in a JavaScript file that I called sample-extension.js.
As your extension starts growing in complexity, you may want to split your code out into multiple files in sub-directories, but this is for a fairly simple extension.
Finally, any images you wish to include, including the icons you will use to promote your extension in the browser add-on store, can go into a subfolder that I called images.
The Manifest.
The manifest is at the heart of your extension; it's how your browser knows which code to run, and when and how to run it.
Let's take a look at a sample manifest for a simple extension:
{
    "manifest_version": 2,
    "name": "<EXTENSION-NAME>",
    "version": "1.0",

    "description": "<A USEFUL DESCRIPTION>",

    "icons": {
        "48": "<URL TO AN ICON>",
        "96": "<URL TO AN ICON>"
    },

    "content_scripts": [
        {
            "matches": ["<URL MATCHER>"],
            "js": ["<RELATIVE PATH TO A JS FILE>"]
        }
    ]
}
That looks like a lot! Let's take a look at the relevant parts:
"name": is the name of your extension (used to list it in your browser's add-on store)."version": is the version of your extension. As you make improvements, you will bump this number so people can be sure they are running the latest version."description": is a human-readable description of what your browser does, so people who come across it in the add-on store know what it is."icons": this is where you supply icons that will display together with your extension in the add-on store (the two sizes are for the add-on store description and a thumbnail).-
"content_scripts": this is the main part of the manifest; it tells your browser which code to run and when to run it. It contains two keys:-
"matches": takes an array of URLs in which your extension should run. -
"js": takes an array of paths to JavaScript files that your browser should run when it encounters one of the URLs in"matches".
-
There are other keys you can provide that represent different functions your extension can do. They are listed here.
So now that we have all of the information we need let's get coding!
Let's Get Started!
Hello DEV!
We will start with the simplest extension I could think of, the "Hello World" of browser extensions so to speak.
- Let's start by creating a directory for our extension. In your terminal type:
mkdir first-extension
cd first-extension
- Inside the
first-extensiondirectory let's create our manifest:
touch manifest.json
- Now, using your favorite editor open up the manifest we just created and paste in the following JSON (I'm usually not a fan of copy/pasting code from tutorials; I think by taking the time to type things out you build muscle memory and retain information better, but I won't make you type out all this JSON yourself):
{
    "manifest_version": 2,
    "name": "first-extension",
    "version": "1.0",

    "description": "Our very first browser extension!",

    "content_scripts": [
        {
            "matches": ["*://*.dev.to/*"],
            "js": ["first-extension.js"]
        }
    ]
}
-
The parts we changed from the generic manifest we saw earlier are:
- We added a name and a description.
- We got rid of the
iconskey being that we aren't using icons in our extension. - We gave the
matcheskey an array containing the URL to dev.to, the website our extension will run on.- The three asterisks are wildcards that will match for: 1) any protocol (HTTP and HTTPS), 2) any subdomain of dev.to (e.g. shop.dev.to), and 3) any page on dev.to (e.g. https://dev.to/yechielk).
- We gave the
jskey an array containing the filenamefirst-extension.jswhich is the file where we will write the code for our extension.
So in other words, what our manifest says is that when our browser visits any URL that matches the pattern we provided (i.e. any page on dev.to) it should run the code in the file
first-extension.js.At this point it might be a good idea to make sure we actually have a
first-extension.jsfile. Let's go back to our terminal:
touch first-extension.js
Perfect! We now (technically) have a working browser extension.
The next thing we need to do is tell our browser to load our extension.
In Firefox go to the following page: "about:debugging".
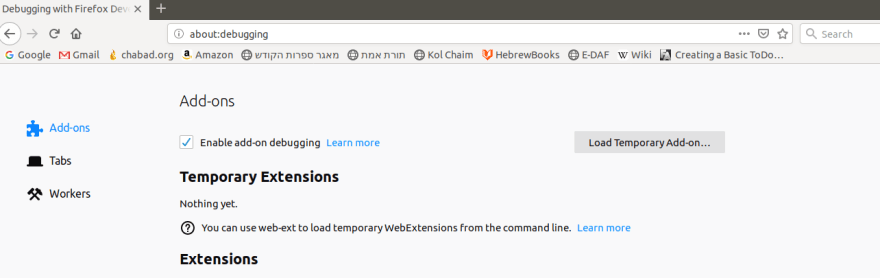
Near the top right corner click on the button that says "Load Temporary Add On..."
Navigate to the folder we created for our extension and select the
manifst.jsonfile.You should see our
first-extensionextension show up under "Temporary Extensions".
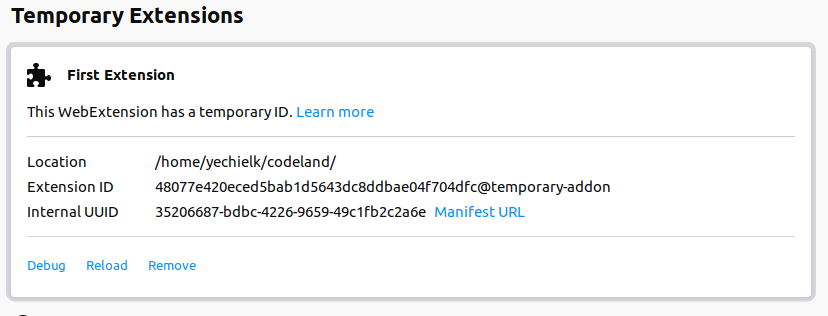
Our extension is now loaded and ready to roll. If we navigate to dev.to our browser will execute the code in
first-extension.js. Of course we can't tell because there is no code infirst-extension.jsso let's fix that.Most people would put a
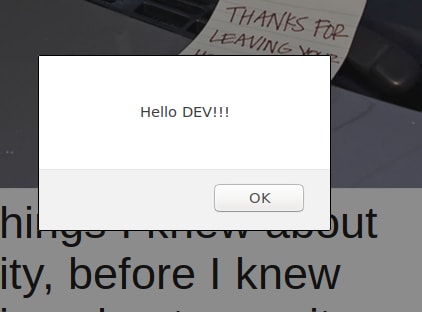
console.log()and see if they can see something in their console, but I thinkalerts are way cooler so let's do that!Open up
first-extension.jsand add the following:
alert("Hello DEV!")
If you refresh dev.to nothing will happen; our browser is still running the old code we loaded. Every time we make changes to our code we need to reload our extension.
Go back to "about:debugging" and look at the temporary extension we loaded. Near the bottom there should be a small link that says "Reload". Click on it and then refresh dev.to. You should see our alert pop up!
- Congratulations! You now have a working browser extension!
Troubleshooting
If you have trouble getting the alert to pop up, or even getting the extension to load double check that your manifest is valid JSON with no syntax errors (you can use an online validator like jsonlint to make sure you didn't miss any commas etc.). Make sure there are no typos in the "js" filename and that the name in the manifest matches the actual name of the file.
One issue encountered by a few participants in the workshop was that they forgot to remove the "icons" key from the manifest. If it's there and the value is not a valid file path the browser will freak out trying to load the icons.
Get Off Twitter!
That was cool! But let's write an extension that actually does something useful. How about an extension that will ping you after being on Twitter for 10 minutes and remind you to take a mental health break.
Let's head back to our manifest and change the value of our
"matches"key from the DEV website to Twitter:
    "content_scripts": [
        {
-            "matches": ["*://*.dev.to/*"],
+            "matches": ["*://*.twitter.com/*"],
             "js": ["first-extension.js"]
        }
    ]
If we reload our extension in "about:debugging" and head to Twitter.com we should see our alert pop up there. This is just to make sure everything is still working.
Let's modify our
first-extension.jsto add the functionality we want.We can use JavaScript's built in
setIntervalfunction that runs a callback function at set intervals.The
setIntervalfunction takes two arguments. A function to run, and an interval in which to run it, given in milliseconds.Let's first set our interval to 10 minutes. We could do something like:
const interval = 600000 // 600,000 milliseconds = 10 minutes
But I find it more readable to break up the interval into its constituent parts. This will make it easier to understand when you come back to the code in a few weeks:
const interval = 1000 * 60 * 10 // 1000ms = 1 second * 60 = 1 minute * 10 = 10 minutes
- Next let's write the function that will run every ten minutes. We want a function that pops up an alert to tell us to get off Twitter. It should look something like this:
function reminder() {
    alert("Get off Twitter!")
}
- Now we have all the parts we need. The only thing left is to put it all together and call our
setIntervalfunction:
setInterval(reminder, interval)
- We now have a browser extension that will do what we want. The only problem is that in order to test it we will have to wait 10 minutes, and:
 so for now let's change our interval to 10 seconds instead of 10 minutes:
- const interval = 1000 * 60 * 10
+ const interval = 1000 * 10
Let's reload our extension in "about:debugging" and head over to Twitter.com.
If we wait 10 seconds we should see our alert pop up!
If we dismiss the alert we should see it popping up again after another 10 seconds etc.
We can go back to
first-extension.jsand switch the interval back to 10 minutes:
- const interval = 1000 * 10
+ const interval = 1000 * 60* 10
- Congratulations, we're done!
What's Next?
So now we have an actual, useful browser extension, but chances are that when you think of interesting browser extensions the ones that come to mind are extensions that actually change things on web pages.
Browser extensions accomplish that by using DOM Manipulation (a class of JavaScript functions that allow it to interact with, and manipulate, web pages).
In part two of this series we will build a fun extension that does just that while attempting to fix the broken hiring system in tech and, as a bonus, includes cats!


