
This tutorial series is now also available as an online video course. You can watch the first hour on YouTube or get the complete course on Udemy. Or you just keep on reading. Enjoy! :)
Web API Core (continued)
Asynchronous Calls
What are asynchronous calls and why should you bother?
Put simply, with a synchronous call, you would give a task to a thread - like fetching data from a database - and the thread waits for this task to be finished and wouldn’t do anything else until the task is done.
With an asynchronous call, this thread wouldn’t wait, at all. Instead it would be open for new tasks and as soon as the other task - e.g. fetching data from the database - is done, it would grab the data and return it.
In our current application this isn’t really necessary. We have no database calls that take lots of time. Our tasks are done in milliseconds. Additionally, it’s very likely that you have more than one thread available for your application. So even if one thread is waiting for a task, another thread can do another task.
But in large applications with lots of users, it can really happen that all threads are busy. In this case, your app won’t respond to a request anymore, which leads to a terrible user experience and you may even lose users or even paying customers because of this. So, this can lead to serious trouble.
That’s why it doesn’t hurt to know this and also implement it early in this project. Although the methods in the CharacterService won’t do anything asynchronous, they will later on when we fetch data from the database.
Let’s start off with the ICharacterService interface.
Here we just add the Task type to our return types.
public interface ICharacterService
{
    Task<List<Character>> GetAllCharacters();
    Task<Character> GetCharacterById(int id);
    Task<List<Character>> AddCharacter(Character newCharacter);
}
Of course, we also add the using directive for System.Threading.Tasks.
After that we switch to the CharacterService class and also add the Task return type and the using directives. Additionally we add the word async to the methods.
public async Task<List<Character>> AddCharacter(Character newCharacter)
{
    characters.Add(newCharacter);
    return characters;
}

public async Task<List<Character>> GetAllCharacters()
{
    return characters;
}

public async Task<Character> GetCharacterById(int id)
{
    return characters.FirstOrDefault(c => c.Id == id);
}
Now we’ve got asynchronous methods. Don’t mind the warnings for now. The code will still be executed synchronously, but when we add Entity Framework with database queries later on, we’ll have asynchronous calls.
Last but not least is the CharacterController. Again we add the Task type with the corresponding using directive and the async keyword to every method. Additionally we add the keyword await to the actual service call. That’s how we call an asynchronous method.
[HttpGet("GetAll")]
public async Task<IActionResult> Get()
{
    return Ok(await _characterService.GetAllCharacters());
}

[HttpGet("{id}")]
public async Task<IActionResult> GetSingle(int id)
{
    return Ok(await _characterService.GetCharacterById(id));
}

[HttpPost]
public async Task<IActionResult> AddCharacter(Character newCharacter)
{
    return Ok(await _characterService.AddCharacter(newCharacter));
}
That’s it. Making test calls with Postman will return exactly the same results as before. Again, please don’t mind that making all these methods asynchronous is not necessary for such a small project, but you’re here to learn something, I guess, so that’s how you should do it with large applications.
Proper Service Response with Generics
Another practice you might come along in professional projects is to return a wrapper object to the client with every service call. Advantages are that you can add additional information to the returning result, like a success or exception message. The front end is able to react to this additional information and read the actual data with the help of HTTP interceptors, for instance, and we can make use of Generics to use the correct types.
Let’s add that object to our models first. So create a new class and call the file ServiceResponse.
The actual class name would be ServiceResponse<T> where T is the actual type of the data we want to send back. Then we can add some properties.
public class ServiceResponse<T>
{
    public T Data { get; set; }

    public bool Success { get; set; } = true;

    public string Message { get; set; } = null;
}
The Data of type T is, well, the actual data like the RPG characters. With the Success property we can tell the front end if everything went right, and the Message property can be used to send a nice explanatory message, e.g. in case of an error.
Similar to the asynchronous implementations, we don’t really need that now, but you will thank me later when you’re working on bigger projects where these kinds of things come in quite handy. For instance, when you catch exceptions in a try/catch block, a ServiceResponse like this might help you.
Anyways, to make use of our new ServiceResponse, we have to modify the return types of our CharacterService and ICharacterService methods.
Let’s start with the interface. We simply add the ServiceResponse class here.
public interface ICharacterService
{
    Task<ServiceResponse<List<Character>>> GetAllCharacters();
    Task<ServiceResponse<Character>> GetCharacterById(int id);
    Task<ServiceResponse<List<Character>>> AddCharacter(Character newCharacter);
}
After that, we do exactly the same in the CharacterService class.
public async Task<ServiceResponse<List<Character>>> AddCharacter(Character newCharacter)
{
    characters.Add(newCharacter);
    return characters;
}

public async Task<ServiceResponse<List<Character>>> GetAllCharacters()
{
    return characters;
}

public async Task<ServiceResponse<Character>> GetCharacterById(int id)
{
    return characters.FirstOrDefault(c => c.Id == id);
}
Of course, we also have to make changes to the actual implementations of the methods. In general, we create a new ServiceResponse object in every method and set the Data property accordingly.
public async Task<ServiceResponse<List<Character>>> AddCharacter(Character newCharacter)
{
    ServiceResponse<List<Character>> serviceResponse = new ServiceResponse<List<Character>>();

    characters.Add(newCharacter);
    serviceResponse.Data = characters;
    return serviceResponse;
}

public async Task<ServiceResponse<List<Character>>> GetAllCharacters()
{
    ServiceResponse<List<Character>> serviceResponse = new ServiceResponse<List<Character>>();
    serviceResponse.Data = characters;
    return serviceResponse;
}

public async Task<ServiceResponse<Character>> GetCharacterById(int id)
{
    ServiceResponse<Character> serviceResponse = new ServiceResponse<Character>();
    serviceResponse.Data = characters.FirstOrDefault(c => c.Id == id);
    return serviceResponse;
}
The CharacterController stays exactly the same, no changes necessary here.
When we test the calls with Postman now, the results look a bit different. For example, here’s the result of getting all RPG characters.
{
    "data": [
        {
            "id": 0,
            "name": "Frodo",
            "hitPoints": 100,
            "strength": 10,
            "defense": 10,
            "intelligence": 10,
            "class": 1
        },
        {
            "id": 1,
            "name": "Sam",
            "hitPoints": 100,
            "strength": 10,
            "defense": 10,
            "intelligence": 10,
            "class": 1
        }
    ],
    "success": true,
    "message": null
}
You see, our characters are wrapped in our ServiceResponse. The front end could react to the new properties and provide a smooth user experience with toasters or something similar instead of presenting complex exception messages in the console - or worse, a frozen application - in case of an error.
Data-Transfer-Objects (DTOs)
You already read about them, now it’s time to use DTOs. First things first, let’s create a folder called Dtos and then another folder called Character for all the data transfer objects regarding the RPG characters.
As already mentioned, the idea behind DTOs is that you’ve got smaller objects that do not consist of every property of the corresponding model. When we create a database table for our RPG characters later in this tutorial series, we will add properties like the created and modified date or a flag for the soft deletion of that character. We don’t want to send this data to the client.
So, we map certain properties of the model to the DTO. That would be the case of returning data to the client.
But it also works the other way around. We already created a new RPG character by only providing an Id and a name. So, why not use a type that only consists of these two properties or other properties we want to use? This is even more important when you build a front end that should use a specific type for the creation of a new character.
At the moment, we have these to cases: Receiving RPG characters from the server and sending a new character to the server.
So let’s create two classes called GetCharacterDto and AddCharacterDto.
Regarding the GetCharacterDto, it should look exactly the same as the Character model for now. I know, it does not seem to make sense, but I don’t want you to be overwhelmed by implementing anything Entity Framework related at the same time. Adding the DTOs is a good preparation.
using dotnet_rpg.Models;

namespace dotnet_rpg.Dtos.Character
{
    public class GetCharacterDto
    {
        public int Id { get; set; }
        public string Name { get; set; } = "Frodo";
        public int HitPoints { get; set; } = 100;
        public int Strength { get; set; } = 10;
        public int Defense { get; set; } = 10;
        public int Intelligence { get; set; } = 10;
        public RpgClass Class { get; set; } = RpgClass.Knight;
    }
}
The AddCharacterDto looks a bit different. Let’s say we want to send every property but the Id to the service. So we can copy the properties of the model again, but remove the Id.
using dotnet_rpg.Models;

namespace dotnet_rpg.Dtos.Character
{
    public class AddCharacterDto
    {
        public string Name { get; set; } = "Frodo";
        public int HitPoints { get; set; } = 100;
        public int Strength { get; set; } = 10;
        public int Defense { get; set; } = 10;
        public int Intelligence { get; set; } = 10;
        public RpgClass Class { get; set; } = RpgClass.Knight;
    }
}
Now that we have our DTOs ready, we can use them in our controller and service methods.
We start with the ICharacterService interface. Instead of the Character type we now returnGetCharacterDto . The parameter of the AddCharacter() method now is of type AddCharacterDto. We also have to add the corresponding using directive.
public interface ICharacterService
{
    Task<ServiceResponse<List<GetCharacterDto>>> GetAllCharacters();
    Task<ServiceResponse<GetCharacterDto>> GetCharacterById(int id);
    Task<ServiceResponse<List<GetCharacterDto>>> AddCharacter(AddCharacterDto newCharacter);
}
The same changes have to be made in the CharacterService. So we replace the Character type with GetCharacterDto and AddCharacterDto, respectively.
public async Task<ServiceResponse<List<GetCharacterDto>>> AddCharacter(AddCharacterDto newCharacter)
{
    ServiceResponse<List<GetCharacterDto>> serviceResponse = new ServiceResponse<List<GetCharacterDto>>();

    characters.Add(newCharacter);
    serviceResponse.Data = characters;
    return serviceResponse;
}

public async Task<ServiceResponse<List<GetCharacterDto>>> GetAllCharacters()
{
    ServiceResponse<List<GetCharacterDto>> serviceResponse = new ServiceResponse<List<GetCharacterDto>>();
    serviceResponse.Data = characters;
    return serviceResponse;
}

public async Task<ServiceResponse<GetCharacterDto>> GetCharacterById(int id)
{
    ServiceResponse<GetCharacterDto> serviceResponse = new ServiceResponse<GetCharacterDto>();
    serviceResponse.Data = characters.FirstOrDefault(c => c.Id == id);
    return serviceResponse;
}
As you can see, Visual Studio Code is not happy with that change. The types do not really match. That’s where we have to map the DTOs with the model. It’s time for AutoMapper.
But before we jump to AutoMapper we also have to fix one small thing in the CharacterController. We change the parameter type of the AddCharacter() method to AddCharacterDto.
[HttpPost]
public async Task<IActionResult> AddCharacter(AddCharacterDto newCharacter)
{
    return Ok(await _characterService.AddCharacter(newCharacter));
}
With that, we don't have to worry about the controller when we're adding AutoMapper.
AutoMapper
We could map the objects manually by creating a new instance of the necessary class and then setting every property one by one. But the idea behind AutoMapper is that it’s doing exactly that for us on the fly.
But first we have to install AutoMapper, of course.
For .NET Core 3.1 we need the package you can find on https://www.nuget.org/packages/AutoMapper.Extensions.Microsoft.DependencyInjection/. To install the package, we go to the terminal and enter dotnet add package AutoMapper.Extensions.Microsoft.DependencyInjection without any specific version to install the latest package.
When the installation is done, you’ll see a new entry in our project file.
<ItemGroup>
  <PackageReference Include="AutoMapper.Extensions.Microsoft.DependencyInjection" Version="7.0.0" />
</ItemGroup>
After the installation we jump to the Startup.cs first. In the ConfigureServices() method we register AutoMapper with services.AddAutoMapper(typeof(Startup)); and add the using directive using AutoMapper;.
public void ConfigureServices(IServiceCollection services)
{
    services.AddControllers();

    services.AddAutoMapper(typeof(Startup));

    services.AddScoped<ICharacterService, CharacterService>();
}
To be able to use the mapping of AutoMapper, we now need an instance of the mapper in our service. So in the CharacterService we add a constructor and inject IMapper. Again, we can initialize a field from that parameter and add an underscore to the private field.
private readonly IMapper _mapper;

public CharacterService(IMapper mapper)
{
    _mapper = mapper;
}
Now we can use the _mapper to set the correct types to the Data property of our ServiceResponse. Let’s start with the GetCharacterById() method. Using the Map() function we first decide in angle brackets which type the value should be mapped to, and the parameter is the actual object that will be mapped.
public async Task<ServiceResponse<GetCharacterDto>> GetCharacterById(int id)
{
    ServiceResponse<GetCharacterDto> serviceResponse = new ServiceResponse<GetCharacterDto>();
    serviceResponse.Data = _mapper.Map<GetCharacterDto>(characters.FirstOrDefault(c => c.Id == id));
    return serviceResponse;
}
The changes for the other two methods are pretty straight forward. In the AddCharacter() method we first map the newCharacter into the Character type, because it will be added to the characters list. So, it’s the other way around.
To map the whole characters list in one line and give it to the serviceResponse, we use the Select() method of LINQ followed by a lambda expression, where we map every Character object of the list into a GetCharacterDto.
public async Task<ServiceResponse<List<GetCharacterDto>>> AddCharacter(AddCharacterDto newCharacter)
{
    ServiceResponse<List<GetCharacterDto>> serviceResponse = new ServiceResponse<List<GetCharacterDto>>();

    characters.Add(_mapper.Map<Character>(newCharacter));
    serviceResponse.Data = (characters.Select(c => _mapper.Map<GetCharacterDto>(c))).ToList();
    return serviceResponse;
}
And finally in the GetAllCharacters() method, we map every single RPG character of the characters list with Select() again, similar to the AddCharacter() method.
public async Task<ServiceResponse<List<GetCharacterDto>>> GetAllCharacters()
{
    ServiceResponse<List<GetCharacterDto>> serviceResponse = new ServiceResponse<List<GetCharacterDto>>();
    serviceResponse.Data = (characters.Select(c => _mapper.Map<GetCharacterDto>(c))).ToList();
    return serviceResponse;
}
Alright, let’s test this now with Postman. Let’s try it with the GetAll route (http://localhost:5000/Character/GetAll).
So, as soon as our Web API is running, run the call in Postman… and we’re getting an error.
AutoMapper.AutoMapperMappingException: Missing type map configuration or unsupported mapping.

Mapping types:
Character -> GetCharacterDto
AutoMapper does not know how to map Character into a GetCharacterDto. You might ask yourself, “it’s called AutoMapper, so why isn’t this working automatically?”
Well, we have to configure one more thing, but then, I promise, AutoMapper is working fine.
We have to create maps for the mappings, and this is organized in Profiles. You could create a Profile for every mapping, but let’s spare the hassle and just create one class for all profiles for now.
At root level, we can create a new C# class and call it AutoMapperProfile. This class derives from Profile. Make sure to add the AutoMapper using directive.
Regarding the implementation, we need a constructor with no parameter and then create a map for the necessary mapping. And, of course, add further using directives.
using AutoMapper;
using dotnet_rpg.Dtos.Character;
using dotnet_rpg.Models;

namespace dotnet_rpg
{
    public class AutoMapperProfile : Profile
    {
        public AutoMapperProfile()
        {
            CreateMap<Character, GetCharacterDto>();
        }
    }
}
Alright, let’s run our test in Postman again.
Now everything works as expected. The same for returning a single RPG character.
But what about adding a new character?
AutoMapper.AutoMapperMappingException: Missing type map configuration or unsupported mapping.

Mapping types:
AddCharacterDto -> Character
We have to create another map. Let’s do that. This time we map the AddCharacterDto to Character.
public AutoMapperProfile()
{
    CreateMap<Character, GetCharacterDto>();
    CreateMap<AddCharacterDto, Character>();
}
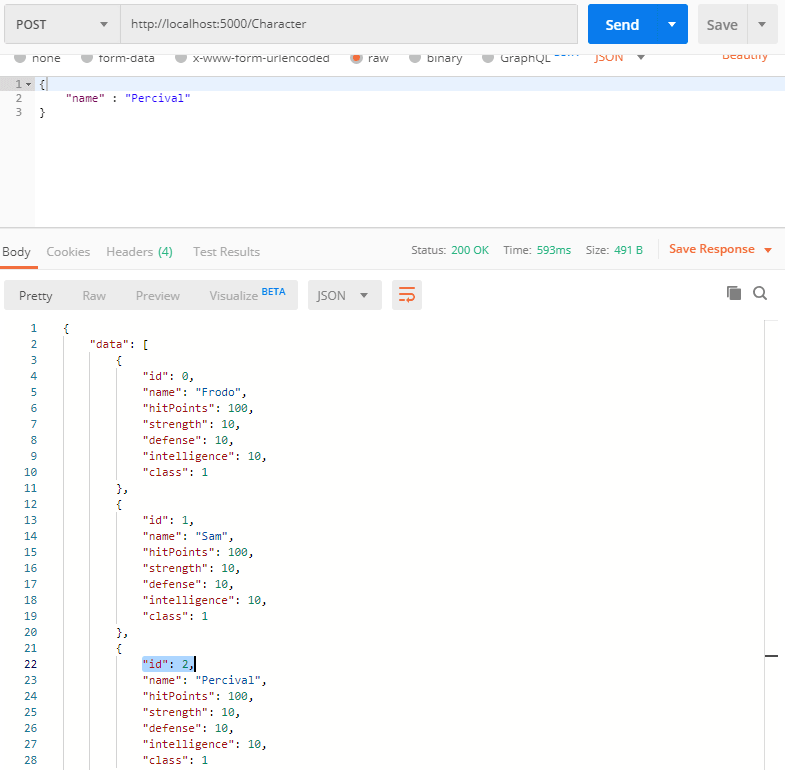
When we test this now, you see that everything works, but the id is 0. That’s because the AddCharacterDto does not provide an Id. That’s exactly what we wanted. Still, let’s fix this by generating a proper Id ourselves.
In the AddCharacter() method in the CharacterService we first create our new Character based on the DTO and then set the correct Id by finding the current max value in the characters list and increasing it by 1.
public async Task<ServiceResponse<List<GetCharacterDto>>> AddCharacter(AddCharacterDto newCharacter)
{
    ServiceResponse<List<GetCharacterDto>> serviceResponse = new ServiceResponse<List<GetCharacterDto>>();
    Character character = _mapper.Map<Character>(newCharacter);
    character.Id = characters.Max(c => c.Id) + 1;
    characters.Add(character);
    serviceResponse.Data = (characters.Select(c => _mapper.Map<GetCharacterDto>(c))).ToList();
    return serviceResponse;
}
Now, without even sending an Id, Percival gets the correct one. Later, when we use Entity Framework Core, it will generate the proper Id by itself.
Alright, we’re done here. I know it was a lot and maybe way too much implementation for such a small project, but in large real-world applications, that’s how it’s done.
That's it for the third part of this tutorial series. Hope it was useful to you. To get notified for the next part, you can simply follow me here on dev.to or subscribe to my newsletter. You'll be the first to know.
See you next time!
Take care.
Next up: Update & remove entities with PUT & DELETE
Image created by cornecoba on freepik.com.
But wait, there’s more!
- Let’s connect on Twitter, YouTube, LinkedIn or here on dev.to.
- Get the 5 Software Developer’s Career Hacks for free.
- Enjoy more valuable articles for your developer life and career on patrickgod.com.