This tutorial series is now also available as an online video course. You can watch the first hour on YouTube or get the complete course on Udemy. Or you just keep on reading. Enjoy! :)
Entity Framework Core
Introduction
Welcome to the Entity Framework Core section.
In this section, you will learn how to connect your Web API to a database and save all the data you’re creating in database tables.
We will utilize Entity Framework to complete all CRUD operations, but this time the changes will be persistent.
So, the RPG characters we will add or update will still be there and the changes will still have an effect, even when we stop the web service from running.
We will install and use Microsoft SQL Server Express for the database and create the necessary tables with the help of code-first migration.
All our service calls will finally be asynchronous.
So, with no further ado, let’s start.
Object-Relational-Mapping & Code-First Migration Explained
What does object-relational mapping actually mean?
It really is quite simple.
So far, we created our RPG characters as models - or classes - in our code. These models consist of several properties. The RPG character has an Id, a name, hitpoints, and so on. In essence, this whole thing is the object.
Databases like SQL Server, SQLite, MySql, MariaDB and many more are relational databases and use relational database systems. They consist of tables to save data and these tables can have relations with each other.
It’s exactly the same with our models. So far we only have one model. But as soon as we add skills, for instance, we have another model that can be related to our RPG characters. A character has certain skills, like throwing fireballs as a mage.
You will find this relation in the database as well. There will be a table for characters, another one for skills and another one for the relation between characters and skills. But that’s just one example.
In the past, developers had to build these relations manually in the database. With an object-relational mapper like Entity Framework, this is history. Entity Framework Core grabs our models and knows what tables have to be created. If the models change, Entity Framework changes the tables and the relations in the database.
Basically you’ll never have to watch at the database tables.
And that’s also the magic behind code-first migration. You build your code - your models - first, and then Entity Framework creates the corresponding database.
There’s also the option to build the database tables first and let Entity Framework build the models, but the first way is more common and also more fun, in my opinion.
Alright, enough with the theory, let’s install everything and then write some code.
Installing Entity Framework Core
First things first. We’re going to use SQL Server, so we need to install the Entity Framework Core Package for SQL Server. You can find it on nuget.org or you open a terminal window and enter dotnet add package Microsoft.EntityFrameworkCore.SqlServer.
After the installation of that package, you’ll find the reference in the project file.
  <ItemGroup>
    <PackageReference Include="AutoMapper.Extensions.Microsoft.DependencyInjection" Version="7.0.0" />
    <PackageReference Include="Microsoft.EntityFrameworkCore.SqlServer" Version="3.1.1" />
  </ItemGroup>
The next step would be installing the actual Entity Framework tool that allows us to use Entity Framework migrations.
First, we enter dotnet tool install --global dotnet-ef.
Then we have to add another package with dotnet add package Microsoft.EntityFrameworkCore.Design. By the way, this was not necessary with previous versions of .NET Core. Now, these installations enable the dotnet ef commands on a specific project.
Alright, that’s it. Entity Framework Core is now available for our project. Let’s install SQL Server now.
Installing SQL Server Express (with Management Studio)
For this project, we install two more things, SQL Server Express and SQL Server Management Studio to have a look at our actual database.
The easiest way to get SQL Server Express would be to simply google for it. The first hit should already take you to the current SQL Server version (2019).
When you hit Try now and scroll a bit down you'll find the link to the Express version.
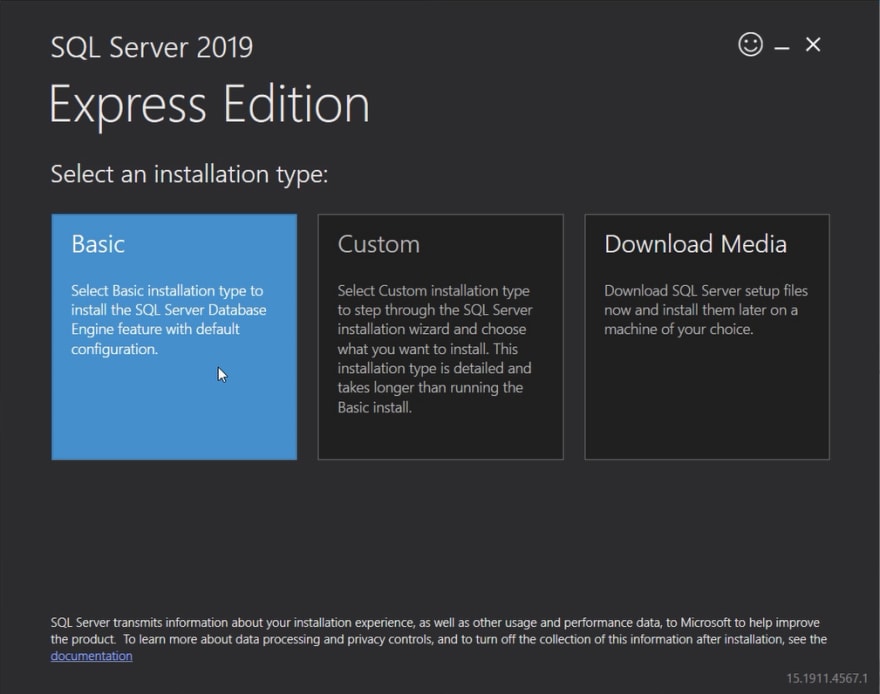
After the download has finished, let's start the Basic installation type and then simply click your way through.
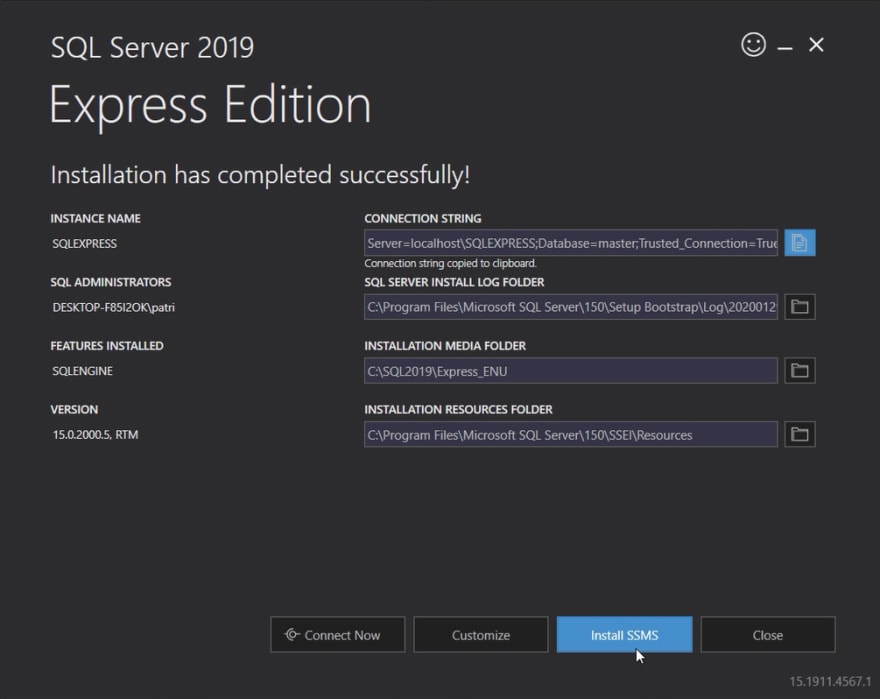
Now pay attention when the installation has completed successfully. First, you're able to copy the connection string we need later. If you want, you can save the string in a text file. But don't worry, we'll find the correct connection string later when we actually implement the code-first migration.
More important is the option Install SSMS at the bottom, which allows you to install SQL Server Management Studio. So let's do exactly that.
The button leads to the download page of the SQL Server Management Studio. Again, we just click our way through the installation.
After the setup has completed, feel free to start the Management Studio and have a first look. You can use Windows Authentication to connect.

In the object explorer on the left, you can then see, that we have no database yet. We could create a new one, but let's do this with the help of Entity Framework now.

Implementing the DataContext
To make use of Entity Framework Core, the first thing we need is a DataContext. For that, we create a new folder called Data and create the new C# class DataContext.
This class inherits from Microsoft.EntityFrameworkCore.DbContext, so make sure to also add the corresponding using directive. An instance of the DbContext represents a session with the database. This means we can use this instance to query the database and save all the changes to our RPG characters.
The description also says that the DbContext is a combination of the Unit Of Work and the Repository pattern. Essentially, it provides an abstraction of our data, so that we’re able to work with the data directly, we can reuse the database access code and add, remove, update and select our data with straightforward methods. We’ll see how this is done in detail very soon.
public class DataContext : DbContext
{
}
So, we’ve got our DataContext class. Now we have to add a constructor. The parameter of this constructor will be of type DbContextOptions<DataContext> and we’ll call it options. And we also have to use the base constructor here with the same parameter.
public DataContext(DbContextOptions<DataContext> options) : base(options) { }
Last but not least we have to add a so-called DbSet, in particular, a DbSet of the type Character. Basically, with this DbSet we’re able to query and save our RPG characters. The name of the DbSet will be the name of the corresponding database table. I think Characters is a good choice then. Usually, you would just pluralize the name of the entity.
Whenever you want to see a representation of your model in the database, you have to add a DbSet of this model. That’s how Entity Framework knows what tables it should create.
public class DataContext : DbContext
{
    public DataContext(DbContextOptions<DataContext> options) : base(options) { }
    public DbSet<Character> Characters { get; set; }
}
Alright, don’t forget to add the necessary using directive, and we’re done with the DataContext.
ConnectionString & Adding the DbContext
Before we can start with the actual migration, we have to provide a connection string and add the DbContext to the service collection of our application.
The connection string will be added in the appsettings.json. We can ignore the appsettings.Development.json, since we don’t make a difference between those two files for now.
So in the appsettings.json file, we add a new section on top and call this section ConnectionStrings. This exact name is important. It’s a convention we can use to register the DbContext in the Startup.cs in a minute.
In this new section, we define the actual connection string. This name doesn’t follow any convention, but usually, you would call this DefaultConnection.
The actual string can be tricky at times. You can use the one you have saved earlier and make little changes or you enter a new one. Either way, you have to check the name of your database server. In my case, it’s localhost\\SQLEXPRESS. Yours can be different. After the server we add the database name, for instance, ‘dotnet-rpg’ - that’s how Entity Framework will call our database if it doesn’t exist yet - and then we add Trusted_Connection=true.
{
  "ConnectionStrings": {
    "DefaultConnection": "Server=localhost\\SQLEXPRESS; Database=dotnet-rpg; Trusted_Connection=true;"
  },
  "Logging": {
    "LogLevel": {
      "Default": "Information",
      "Microsoft": "Warning",
      "Microsoft.Hosting.Lifetime": "Information"
    }
  },
  "AllowedHosts": "*"
}
That’s the connection string. Now we have to access this string in the Startup.cs.
Here in the ConfigureServices() method, we add our DataContext right on top with services.AddDbContext<DataContext>(). As parameter, we add a lambda expression with the function UseSqlServer() which configures our context to connect to a SQL Server database. This method, in turn, finally takes the connection string.
We access the Configuration and call GetConnectionString() with the DefaultConnection. The method GetConnectionString() accesses the section we added in the appsettings.json. That’s why we had to call this section ConnectionStrings.
public void ConfigureServices(IServiceCollection services)
{
    services.AddDbContext<DataContext>(x => x.UseSqlServer(Configuration.GetConnectionString("DefaultConnection")));
    services.AddControllers();
    services.AddAutoMapper(typeof(Startup));
    services.AddScoped<ICharacterService, CharacterService>();
}
Alright, we’re done here. Let’s start the first migration.
First Migration
Let’s have a look at the options of the dotnet ef command first.
In the terminal, we enter dotnet ef -h. As you can see, there are not a lot of commands available.
Commands:
  database    Commands to manage the database.
  dbcontext   Commands to manage DbContext types.
  migrations  Commands to manage migrations.
In fact, we only need two of them, database and migrations. We start with migrations.
To run the first migration, we type dotnet ef migrations add InitialCreate. With this command, we add a new migration and call it Initial or InitialCreate, because it’s our initial migration that will create the database and all tables.
When this is done, we see that a new folder has been created.
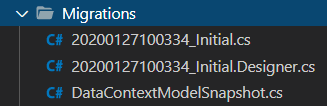
These files are used by Entity Framework so that it knows what it should do with this migration. They provide information about your tables and fields that Entity Framework uses to build your database. Let’s have a look at the first file.
This one consists of an Up() and a Down() method. In the Up() method you can see what’s going to happen when we commit this migration. Entity Framework will create the table Characters with the columns and also set the Id as the primary key.
protected override void Up(MigrationBuilder migrationBuilder)
{
    migrationBuilder.CreateTable(
        name: "Characters",
        columns: table => new
        {
            Id = table.Column<int>(nullable: false)
                .Annotation("SqlServer:Identity", "1, 1"),
            Name = table.Column<string>(nullable: true),
            HitPoints = table.Column<int>(nullable: false),
            Strength = table.Column<int>(nullable: false),
            Defense = table.Column<int>(nullable: false),
            Intelligence = table.Column<int>(nullable: false),
            Class = table.Column<int>(nullable: false)
        },
        constraints: table =>
        {
            table.PrimaryKey("PK_Characters", x => x.Id);
        });
}
The Down() method, which is used to rollback a migration, simply deletes the Characters table.
protected override void Down(MigrationBuilder migrationBuilder)
{
    migrationBuilder.DropTable(
        name: "Characters");
}
I’d say we run this migration. In the terminal, we enter dotnet ef database update. With this command, Entity Framework is going to run the last migration and so create the new table.
Alright, let’s have a look at the SQL Management Studio.
There is our database dotnet-rpg with the table Characters. Beautiful.
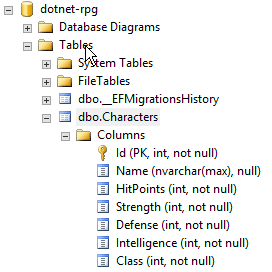
The table is empty, though. Let’s change that.
That's it for the 5th part of this tutorial series. Hope it was useful to you. To get notified for the next part, simply follow me here on dev.to or subscribe to my newsletter. You'll be the first to know.
See you next time!
Take care.
Next up: All CRUD Operations with Entity Framework Core (GET, POST, PUT & DELETE)
Image created by cornecoba on freepik.com.
But wait, there’s more!
- Let’s connect on Twitter, YouTube, LinkedIn or here on dev.to.
- Get the 5 Software Developer’s Career Hacks for free.
- Enjoy more valuable articles for your developer life and career on patrickgod.com.


