When you use containers for your application, one of the things you need to think about is how to move (aka promote) the container images you generate across different environments.
In this series, I will explore different ways to do so... with the help of Azure DevOps
Intro
While in the first article of the series we explored the "Base Registry" approach to promote a Container image across different environments, in this second part we will get rid of the additional registry and we will use a Build Artifact instead.
Build artifacts are the files that you want your build to produce. Build artifacts can be nearly anything that your team needs to test or deploy your app. For our case, the Container Image produced at the end of the build will be our Build Artifact.
And the good part is that Build Artifact are immutable!
The Build
As in the last article, we want to create our container image with all we need for our application to function properly. I will not focus on the image creation at this time.
The build pipeline is similar to the one we have used last time, but with a big difference at the end.

As you can see, I not only create the image, but I "Save it" and then I pusblish it as a Build Artifact.
Build Artifacts are stored into Azure DevOps services directly, or you can even select your own fileshare for them. I normally use the service because it is free and it doesn't require any maintenance.
The "Save image" step uses the docker save command to export the container image we have just created into a .tar file.

The save command is not directly embedded in the v2 of the Docker task, so we need to manually type the command name, and insert the image name in the arguments box.
I have defined variables for the names so I can reuse them across the different environments.
Also, note that I have to specify the output for the command, and I use the $(build.artifactstagingdirectory) system variable to store the exported image in the folder the Azure DevOps service uses as base path.
As soon as I have my image saved in a "normal file" I then can use it as a Build Artifact. To do so, I have to perform a Publish Artifact step:

Nothing too difficult here. This step just take thes content of the $(build.artifactstagingdirectory) folder, zips it and makes it available to a Release Pipeline.
Notice that I selected "Azure Pipelines" as publish location for my artifact: this allows me to use the service storage instead of a custom file share.
Let's Release
Ok, now we have our container image, and we have created a Build Artifact with it.
We are going to create a Release Pipeline which will use the Build Artifact as input, and will use it to deploy to the different environments.

To do so, simply click on the "Add an artifact" button (after creating a new release pipeline), and select "Build". Select the Build Pipeline we just created before, and you're ready to go.
Also, be sure to enable the Continuous Delivery flag so this release pipeline can run every time a new container image is pushed to the registry.
Now, as in the previous example we have three different environments: Dev, Test, and Prod. First thing to do is to create three Stages in the Pipeline.
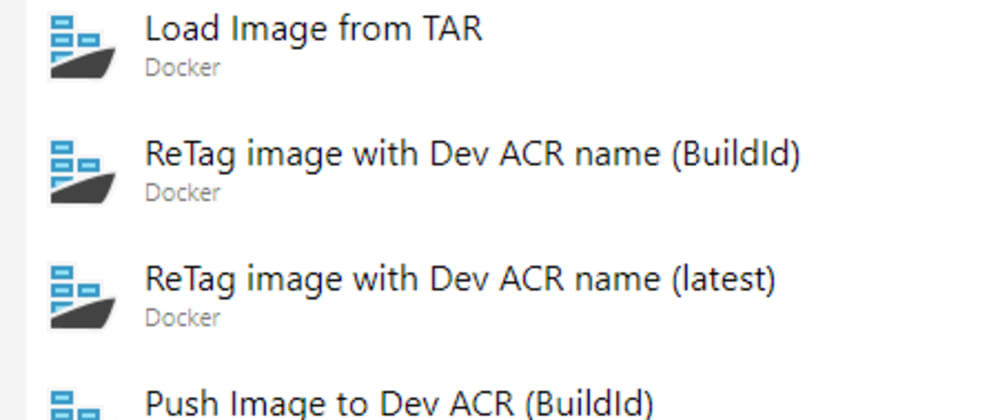
Then let's edit the Dev stage. We need to:
- Load the image from the .tar file in the Build Artifact
- Change it's name so it can be pushed to the Dev registry
- Push it to the Dev registry

The main part is, obviously, the first step: we need to restore the image from the .tar file we created in the build. Adain, a little trick is necessary.
The load command, in fact, is not directly embedded in the v2 of the Docker task.

So we need to manually type load as command name, and fill in the parametersin the arguments box.
Note that the input path uses the $(System.DefaultWorkingDirectory) system variable: it represents the folder where the Build Artifacts are stored for the Release Pipelines. The full path is composed by the base directory, the name of the Artifact we have chosen, "drop" (or anything else you defined in the Build Ppipeline's Publish Artifact step) and finally the name of the file. Once again, I have defined variables for the names so I can reuse them across the different environments.
Next we need to tag the image differently, to add the name of the registry. This is because if you have to push an image to a certain registry, you need the image full name as "registryName/ImageName", where registryName is the full qualified domain in case of anything different from Docker Hub (for Azure Container Registry, it would be something like myregistryname.azurecr.io
Again, the tag command is not embedded in the v2 of the task so we need to use the arguments box. The use of variables is optional but I recommend it, it just makes everything easier to automate and templatize.

Differently from the previous case we analyzed, in this case we can not only tag the image as "latest" but, as in the image above, tag it with a reference of the Build process (in my case I use BuildId). This is possible because the Release Pipeline is triggered directly from a Build Pipeline (or anyway it references it) so we have all the Build information available.
Last step, we need to push the image to the new registry.

This time, the push command is fully supported so no need for the custom arguments!
As for the previous step, also in here we can reference some Build variables.
And we are done for Dev!
Now we can replicate the same process to the other environments, just changing the source and target registries.
Ideally when pushing to the environment-specific registry you should have a mechanism to notify your target host service (App Service, AKS, Container Instances, etc) of the new image so the deployment can be executed.
And of course you probably want to set some Release Gates or Approvals for deploying to Test and Prod.
Conclusion
This process is not widely used, mostly because people don't know about it, but it is definitely my favorite:
- You have 1:1 mapping between build and release
- this means that the image you build and the one you deploy are for sure the same.
- You can directly reference the Build number, or any other parameter that comes from the Build, because you CI and your CD pipelines are directly related.
- You have full traceability
In the next article we will explore how to achieve the same, but using the new YAML MultiStage pipeline.
Stay tuned!
Like, share and follow me 🚀 for more content:
📽 YouTube
☕ Buy me a coffee
💖 Patreon
🌐 CoderDave.io Website
👕 Merch
👦🏻 Facebook page
🐱💻 GitHub
👲🏻 Twitter
👴🏻 LinkedIn
🔉 Podcast


