When you use containers for your application, one of the things you need to think about is how to move (aka promote) the container images you generate across different environments.
In this series, I will explore different ways to do so... with the help of Azure DevOps
Intro
In the first article of the series we explored the "Base Registry" approach to promote a Container image across different environments.
In the second part we got rid of the additional registry and we used a Build Artifact.
In this third and final part we will use the same approach as the second one, but using 100% the YAML Pipelines (or, more appropriately, the Multi-stage Pipelines).
Before starting
While the Multi-stage Pipeline editor should be already the default experience at the time of writing, if you can't see it make sure to have it enabled in the preview features.
In this article I will use some YAML code snippet to go through the examples.
You can download the complete YAML Pipeline definition file here.
If you want to have the FULL definition, which includes all the build steps for a .Net Core application, you can download it here.
Ok, let's start
Pipeline structure
As I have mentioned, we are going to use the Multi-stage Pipeline, the YAML-based version. As the name says, we can have multiple Stages inside a single pipeline definition. Each Stage will be delegated to a specific function.
In this example, riding on the previous articles, I'm going to build the application and the image, and deploy to 3 environments (Dev, Uat, and Prod).
Therefore, we are going to use 4 stages.
 stages:

   - stage: CI
     displayName: 'CI stage'
     jobs:
     #JOBS HERE

  - stage: CDDev
     displayName: 'CD stage for DEV'
     jobs:
     #JOBS HERE

  - stage: CDUat
     displayName: 'CD stage for UAT'
     jobs:
     #JOBS HERE

  - stage: CDProd
     displayName: 'CD stage for PROD'
     jobs:
     #JOBS HERE
I'm going to explain later why I have decided to use different stages for different environments instead of one "CD" stage and multiple jobs for the different environments.
The CI - aka Building the image
As in the last article, we will start with building the application and creating our container image from it, with all we need for our application to function properly.
We will again use the "Artifact way" to publish our Image.
To do so, we start including in the CI Stage all the tasks the are responsible for building/compiling/publishing our application:
- stage: CI
     displayName: 'CI stage'
     jobs:
     - job: Build
       displayName: 'Build for MyProject'
       steps:
        # Add all the tasks you need to build your project
       - task: WhateverTask@1
         displayName: 'Build MyProject'
         # all the parameters you need
When we have that, we need to create the Container Image and, as we did last time, export that in the Tar format:
   - task: Docker@2
     displayName: 'Build MyProject image'
     inputs:
       repository: '$(ImageName)'
       command: build
       Dockerfile: MyProject/Dockerfile
       tags: $(Build.BuildId)

   - task: Docker@2
     displayName: 'Save image to TAR'
     inputs:
       repository: '$(ImageName)'
       command: save
       arguments: '--output $(build.artifactstagingdirectory)/$(ImageName).image.tar $(ImageName):$(Build.BuildId)'
       addPipelineData: false
Those commands are exactly like the ones we used in the previous article, but in their YAML representation.
The "Save image to TAR" step uses the docker save command to export the container image we have just created into a .tar file.
I have defined variables for the names so I can reuse them across the different environments.
Variables can be specified inside the YAML or in the UI. In this case I decided to include it into the YAML, therefore I placed this before the stages definition (so they can be accessed from within any of the stages and jobs):
   variables:
     ImageName: 'myprojectreportexecutor'
Also, note that I have to specify the output for the command, and I use the $(build.artifactstagingdirectory) system variable to store the exported image in the folder the Azure DevOps service uses as base path.
As soon as I have my image saved in a "normal file" I then can use it as an Artifact. In the previous article we used the Build Artifact object, in this example we will instead use the new Pipeline Artifact object (which is available only in the YAML Pipelines, not in the Classic ones). To do so, I have to add a Publish Pipeline Artifact step:
  - task: PublishPipelineArtifact@1
    displayName: 'Publishing Image as Pipeline Artifact'
    inputs:
      path: $(build.artifactstagingdirectory)
      artifact: 'ContainerImage'
Pipeline Artifacts are stored into Azure DevOps services directly. Differently from the Build Artifacts, at the time of writing it is not possible to select your own fileshare for saving them.
More info about the difference between Pipeline and Build Artifacts here
Nothing too difficult here. This step just takes the content of the $(build.artifactstagingdirectory) folder, zips it and makes it available to subsequent steps/jobs/stages.
The artifact parameter represent the name you want to give to that file on the system. It is an optional parameter, but I'd advise to always name your artifacts so it will be easier to reference them later on.
And then the CD - aka deploy time
Ok, now we have our container image, and we have created a Pipeline Artifact with it. It's time to fill in the other stages.
Before starting, it's importat to understand few things here.
Deployment jobs
In the CI part of our pipeline we used one (or more) job.
A job is a generic "collection of task", and usually it is associated with Continuous Integration. Why? Because every job automatically download the source code from the repo associated with the pipeline.
We don't want our code to be re-dowloaded before each deployment, do we?
For this reason, Azure Pipelines makes available another type of job, specialized in deployment operations: the deployment job.
This particular job not only doesn't download the code from the repo, but it automatically downloads any Pipeline Artifact published in any previous stage!
Strategies
Another peculiarity of the deployment jobs is that they support different deployment strategies. At the time of writing they are runOnce, rolling and canary.
I will not cover them all in this post (mode information here), we are going to use the runOnce one that, as the name says, executes every step only once.
Lifecycle hooks
Every deployment strategy has some "Lifecycle hooks" which basically orchestrate the deployment operations: preDeploy, deploy, etc (more info here).
Again, I'm not going to cover them in details in this post. I will use the deploy hook because it is the only one which actually downloads automatically the artifacts.
The deployment steps
Ok, now that we have a much clearer (hopefully) idea about those topics, let's take a look at the top of the deployment stage.
I will focus on the DEV environment, because the other ones will be pretty much the same.
   - stage: CDDev
     displayName: 'CD stage for DEV'
     jobs:
     - deployment: Dev
       displayName: 'Deploy to DEV'
       environment: MyProject-DEV
       strategy:
         runOnce:
           deploy:
             steps:
As you can see, and as I mention before, here I'm using the runOnce strategy with the deploy hook.
By default, this stage will be executed only if the previous stage (the CI) has been succesful.
Wait a minute. What is that "environment"?
Environments are another new concept available only in YAML pipelines. They allow you to define and map some actual environment for using them as your deployment targets.
At the time of writing, they support only Kubernetes and Virtual Machines as specific resource, but you can create one with no resources. The reason for doing so is that you will have a full history of any deployment to that specific environment.
Also, you can now require approvals for deploying to a specific environment, and that approvals have to be defined in the environment object.
Now, as in the previous example we have three different environments: Dev, Test, and Prod. First thing to do is to create them in Azure DevOps.
If you don't manually create the environment in Azure DevOps UI, they will be created automatically the first time the pipeline is executed.
Now that we have the environment ready, we can continue.
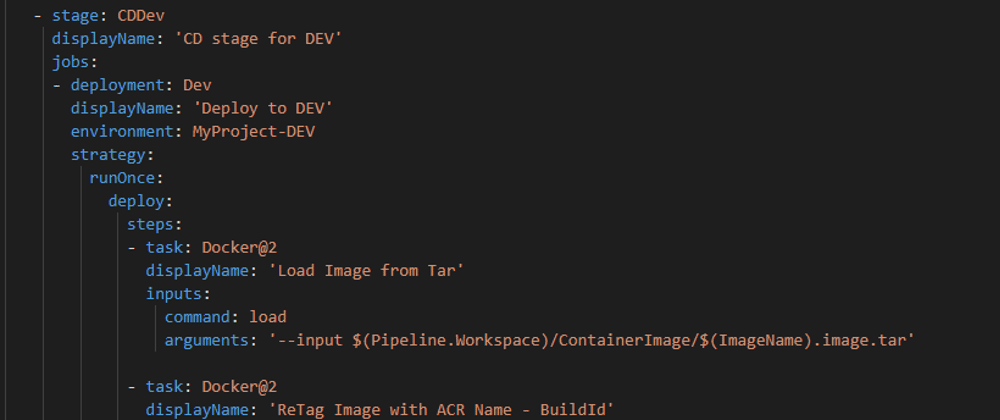
First step: we need to restore the image from the .tar file we created in the build.
  - task: Docker@2
    displayName: 'Load Image from Tar'
    inputs:
      command: load
      arguments: '--input $(Pipeline.Workspace)/ContainerImage/$(ImageName).image.tar'
Note that the input path uses the $(Pipeline.Workspace) system variable: it represents the folder where the Pipeline Artifacts are downloaded. The full path is composed by the base directory, the name of the Artifact we have chosen in the CI Publish Artifact step) and finally the name of the file. Once again, I have defined variables for the names so I can reuse them across the different environments.
Next we need to tag the image differently, to add the name of the registry. This is because if you have to push an image to a certain registry, you need the image full name as "registryName/ImageName", where registryName is the full qualified domain in case of anything different from Docker Hub (for Azure Container Registry, it would be something like myregistryname.azurecr.io).
  - task: Docker@2
    displayName: 'ReTag Image with ACR Name - BuildId'
    inputs:
      containerRegistry: MyProjectACRdev # This comes from the Service Connections
      repository: '$(ImageName)'
      command: tag
      arguments: '$(ImageName):$(Build.BuildId) $(ContainerRegistryNameDev)/$(ImageName):$(Build.BuildId)'
The use of variables is optional but once again I recommend it, it just makes everything easier to automate and templatize.
The containerRegistry parameter value needs to match the name of the Service Connection you defined in the Settings that maps your Azure Container Registry (or any other Docker Registry)
Last step, we need to push the image to the new registry.
  - task: Docker@2
    displayName: 'Push Image to ACR'
    inputs:
      containerRegistry: MyProjectACRdev
      repository: '$(ImageName)'
      command: push
      tags: $(Build.BuildId)
As for the previous step, also in here we can reference some Build variables.
And we are done for Dev!
Now we can replicate the same process to the other environments, just changing the source and target registries (and of course the environment name in the Stage).
Ideally when pushing to the environment-specific registry you should have a mechanism to notify your target host service (App Service, AKS, Container Instances, etc) of the new image so the deployment can be executed.
One last thing, as I mention before you probably want to set some Approvals for deploying to Uat and Prod. This can be done in the Environments section.
Multiple Stages vs Single Stage for deployment
As I have mentioned before, I decided to create 4 stages (1 for CI and 3 for CD).
This has been necessary because I want to use Approvals.
In fact, approvals are applied at Environment level, and the approval engine of Azure Pipelines requires that "the execution of a run pauses before entering a stage that uses the environment. Users configured as approvers must review and approve or reject the deployment." (from the official documentation here)
This means that even thought the Environment parameter belongs to the Deployment Job, it is not that job which will wait for the approval. Instead, the Stage containing that Deployment Job will be the one waiting.
Therefore this also means that if you have multiple Deployment Jobs in a Stage, with each job associated to a different environment, and each environment having its own approval, then you would need to approve all the deployment for having the stage to run, making it useless.
If, instead, you have multiple Stages, one per each environment, everything works great.
Let's run this
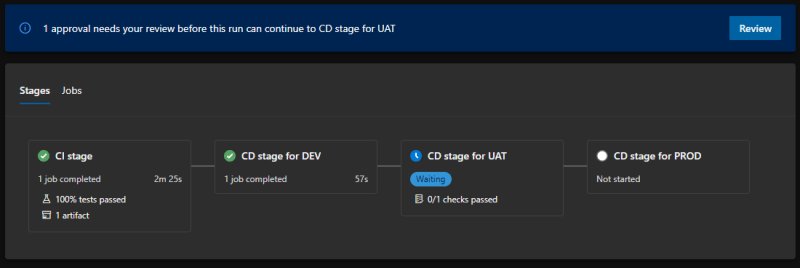
When you run the pipeline, the UI will be sligthly different from what you are used to.
This is the main screen:

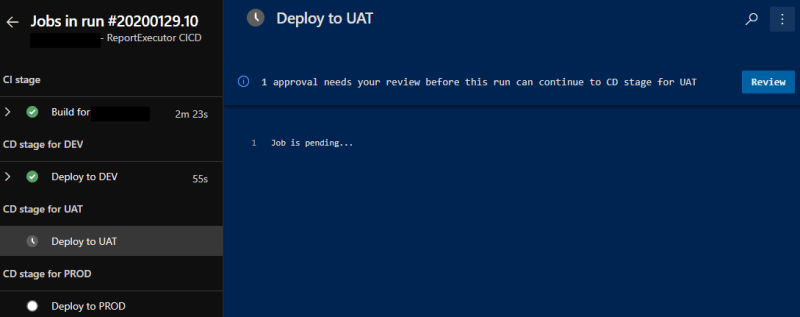
This instead is the execution log screen:

I have added an Approval request for both Uat and Prod, so this is what happens when the deployment to Dev is successful:
And this is inside the logs:
This is what you see when clicking on the "Review" button:

You have obviously the chance to Approve or to Reject the deployment. If you reject, nothing will be deployed to that environment and the whole pipeline process will stop.
The approval is customizable, in my case I specified that at lest one of the required approvers must approve in order to continue.
Last but not least, the Environments view:

It's pretty useful because you can have an immediate picture of what is deployed in any environment at any given time.
Conclusion
This process is not widely used, mostly because people don't know about it, but it is definitely my favorite:
- You have 1:1 mapping between build and release
- this means that the image you build and the one you deploy are for sure the same.
- You can directly reference the Build number, or any other parameter that comes from the Build, because you CI and your CD pipelines are directly related.
- You have full traceability
In this article we achieved everything using the new Multi-stage Pipelines experience, which allows to version and protect the YAML files (for example setting up a branch policy).
Of course, if you take a look at the full YAML file, it's pretty long and not very readable. In fact, one of the things the we usually recommend is to use Templates and link them in instead of having everything in the same file.
I will cover this in a new post sometimes soon, but if you want to take a look at it here is the documentation
Like, share and follow me 🚀 for more content:
📽 YouTube
☕ Buy me a coffee
💖 Patreon
🌐 CoderDave.io Website
👕 Merch
👦🏻 Facebook page
🐱💻 GitHub
👲🏻 Twitter
👴🏻 LinkedIn
🔉 Podcast


